Quantcast
Channel: Gear Archives - CYCLINGABOUT.com
Viewing all 150 articles
Browse latest View live

All About Front Racks For Bicycle Touring

$
0
0

People have been touring with front loads since the 1800s, but front racks really only became popular with the advent of bicycle panniers in the middle of the 20th century. Nowadays, we have many different front rack styles that suit the different types of gear and bikes we employ for our tours.

Let’s take a closer look at the different styles of front racks for touring bikes.

Lowrider Front Racks

front racks

The Tubus Tara lowrider rack on my Co-Motion touring tandem.

Lowrider racks are common on touring bikes as they keep your pannier weight as low as possible to the ground. This allows heavily-laden touring bikes to feel as stable as possible at both low and high speeds. Most lowrider racks require both a mid-mount on the fork and lower eyelets at the dropout, however, I’ll cover alternative mounting methods below.

Popular models: Blackburn Outpost, Nitto MT-Campee, Surly Front Rack, Tubus Duo and Tara.

Porteur Front Racks

front racks

A MAP Cycles bike with porteur front rack. Image: MAP Cycles Flickr

Porteur racks are designed to stabilise large front loads above the wheel. Their history stems from the 1950s in France where the ‘porteurs’ would distribute large quantities of newspapers from the front of their bikes. Nowadays, this open rack design tends to be better at carrying boxes and other unusually shaped objects due to the large rack platform.

Popular models: CETMA 5-Rail, Soma Porteur, Surly 24-Pack, Velo Orange Porteur. 

Basket Front Racks

A Gamoh FR-1 Basket rack. Image: SomaFab

A basket rack is essentially a porteur rack with a cage around the outside. They key advantage of this design is to reduce the need to strap things down. You can create your own basket rack using a porteur rack in combination with a wire basket. ‘Wald’ is a renowned wire basket brand.

Popular models: Blackburn Local Basket, Gamoh FR-1, Minoura King Carrier, Soma Porteur, Velo Orange Porteur.

Suspension Front Racks

Suspension rack

The Faiv Hoogar rack allows your panniers to become ‘sprung’ weight.

Suspension racks are designed to connect to a front suspension fork. There are two different types of suspension rack however; one mounts the rack from above the suspension (like the Faiv Hoogar), the other mounts it below (like the Old Man Mountain). In order to get the most out of the suspension of your bike, it’s best to use a ‘sprung’ rack like the Faiv Hoogar.

Randonneur Front Racks

Front racks

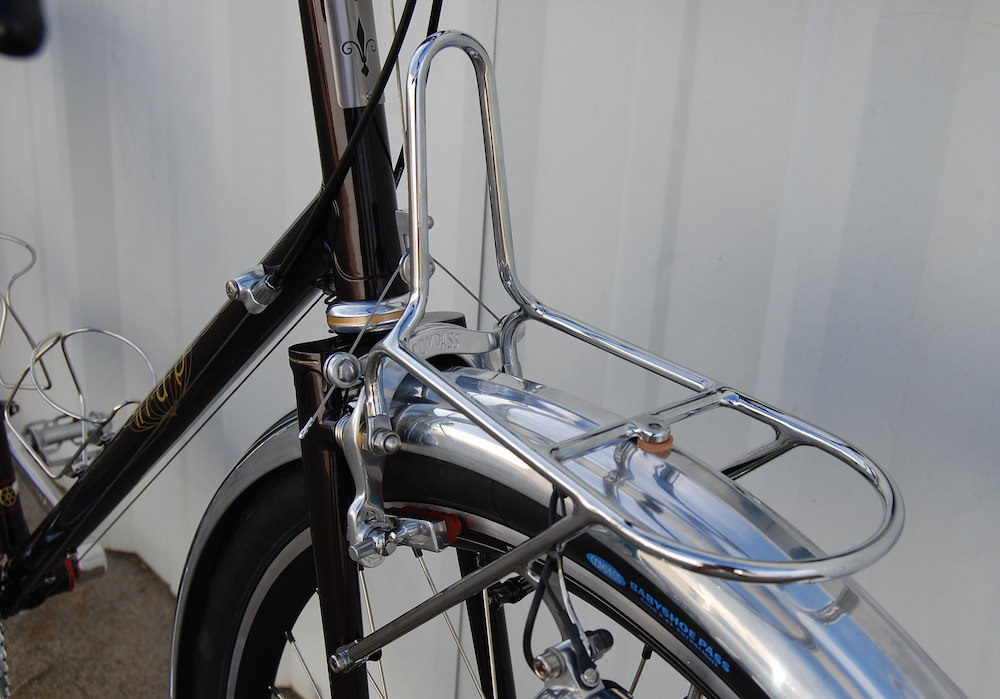
A MAP Cycles Bike with a front randonneur rack. Image: MAP Cycles Flickr

These minimal racks are used to support the weight of small randonneur bags. The lower struts connect to rim brake mounts or lower fork eyelets, and the upper struts generally connect to the fork crown hole.

Popular models: Nitto Campee 32, Soma Champs Elysees, Surly 8-Pack, Velo Orange Constructeur, Velo Orange Randonneur.

Decaleur Mounts

A steerer mounted decaleur. Image: SomaFab

A decaleur is a special mount that is designed to stabilise the load of a front randonneur bag. They can mount directly from a front rack, your stem or steerer tube and make bag mounting very straightforward. A metal bracket generally needs to be custom fitted to the randonneur bag to achieve the perfect fit. Decaleur brackets for steerer tubes are available in both 1″ and 1 1/8″ diameters.

Where Is The Best Location To Carry A Front Load?

In a handling sense, it’s best to pack your load as low as possible on a bike. That’s one of the reasons why touring bikes often use front panniers on lowrider racks. By keeping your weight low, you reduce the bike’s centre of gravity and therefore achieve better manoeuvrability. That said, light loads of less than 10kg (22lbs) are generally fine above the height of the wheels on both randonneur or porteur racks.

I’ve completed testing between front and rear pannier loading found HERE.

front racks

Testing the handling effects of front panniers.

The Different Rack Construction Materials

Front racks can be made out of steel, stainless steel, titanium or aluminium.

I’d like to stress that all of these materials can be employed to construct a strong rack, but the most durable tend to be made out of steel or stainless steel. Steel racks are the most widely used by round-the-world cyclists – I’ve had my Tubus Tara for a decade now!

Aluminium racks tend to have a higher rate of failure, so if you’re going aluminium, do a bit of research on the racks durability first.

page street cycles

A Page Street Cycles custom stainless steel rack.

Understanding Bikes Optimised For Front Loading

You may have heard of ‘low trail’ bikes. These bikes are designed with faster steering speeds in order to offset the slowing effect of a front load. I’ve had a good play with low trail steering and have determined that it can be a good thing for sub-10kg loads and road handlebars (due to the reduced steering leverage when compared to a flat handlebar). With a heavy load, I’ve found a bikes steering speed has little influence over the increased steering effort.

Rawland Ravn

The Rawland Ravn’s fast steering is designed to offset the slowing nature of a front load.

What If Your Bike Doesn’t Have Rack Eyelets?

Don’t worry, there are lots of products and solutions:

front racks

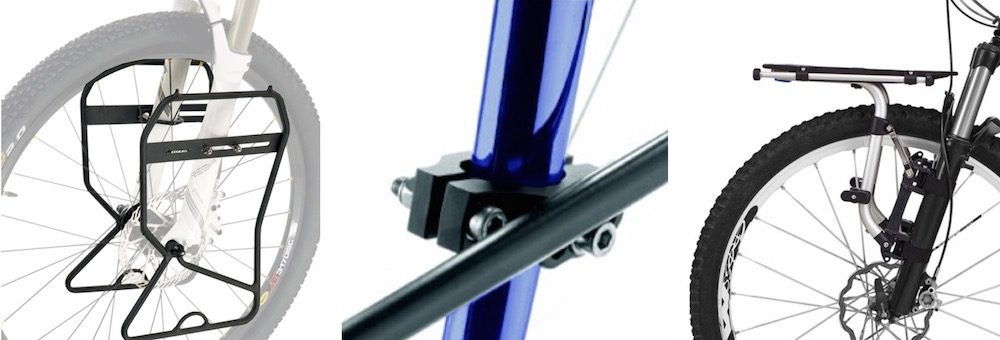
L-R: Axiom Journey Disc, Tubus mid-mounting kit, Thule Pack ‘n Pedal QR rack.

Axiom Journey Disc Lowrider – The Journey rack mounts at your wheel skewer and fork leg to create a lowrider system that suits most forks.

Tubus Mounting Kit – If your fork doesn’t come with mid-mounts, Tubus make a nice conversion bracket that will suit most lowrider racks.

Thule Pack ‘n Pedal – The Pack ‘n Pedal uses webbing ratchet straps to fit any shape. They also sell side frames in order to attach your panniers.

front racks

L-R: P clamps, CETMA 5 Rail porteur rack, Old Man Mountain front suspension rack.

P-Clamps – Mounting a rack to a fork can be as simple as finding rubberised p-clamps from your hardwear store and mounting a front rack to your bike.

CETMA 5-Rail – This porteur-style steel rack is a popular option for bicycle couriers as it’s able to handle 30kg+ (60lbs) and will fit almost any bike.

Old Man Mountain – This business makes all kinds of rack solutions to suit suspension forks, fat bikes and thru axle frames. Most of their racks connect at the quick release skewer and use a p-clamp solution for the upper mounting.

Rear Panniers On Front Racks

I’ve found that it’s no problem to fit large rear panniers on lowrider front racks with any wheel size larger than 26 inch. This will give you the opportunity to fill your panniers with lighter, bulkier items up front (like sleeping gear).

front racks

Using large rear panniers on my front lowrider rack.

Summary

While this front rack resource throws lots of options into the mix, finding the right rack style is simple: it’s all about matching your front rack to your intended use.

If you’re carrying front panniers or if you have a heavy front load – it’s hard to go past lowrider racks. This rack and pannier system puts your gear weight in the most optimal location for good bike handling. Panniers are also waterproof and easy to remove from a bike. My favourite brand of front pannier rack has to be Tubus; their racks are constructed using steel, they’re lightweight and they seem to last forever.

When carrying a modest load you can keep your gear above the wheel. Porteur and basket-style racks can stow awkward shaped objects as well as large 20L porteur bags (about the same size as a single rear pannier). Alternatively, randonneur racks and decaleurs do an excellent job of making your front gear accessible, although they don’t offer much in the way of storage.

If you have front suspension and will be riding off-road, it’s a great idea to look into the Faiv racks. Although quite cost prohibitive, you’ll get the most out of your suspension system when your gear weight is “sprung”. The Faiv racks are far less essential for smooth road touring, so check out the Old Man Mountain or Axiom disc racks in that case.

Don’t Forget To Read: Rear Pannier Racks For Bicycle Touring

The post All About Front Racks For Bicycle Touring appeared first on CyclingAbout.


The 16 Best Bike Trailers for Bicycle Touring

$
0
0

Like the clip-in vs. flat pedal debate, bike trailers are very polarising amongst cyclists. There tends to be the perception that bike trailers add a lot of weight and can be cumbersome to use. While somewhat true – when you match a trailer to your use, you may find they’re better than using panniers!

This article will look at the best bike trailer options for touring… but first, a little intro about bike trailers and trailer design.

So Why Use Bike Trailers?

This is just a few reasons to ditch the panniers…

To Use A Lightweight Bike
Trailers eliminate the need for heavy-duty frames, forks and wheels. This not only allows you to use lighter weight bikes and components, but permits the use of mountain, road, cyclocross and folding bikes (as touring bikes).

Carry a Hiking Pack
If you’re biking and hiking, it can be awkward to carry a decent-sized hiking pack on the bike. Trailers are able to easily cradle large bags.

Carry Bulky Items
Given the large single storage space of trailers, you can fit long tent poles and other bulky items into trailers.

One Drybag Instead of Four Panniers
It’s often easier to cart around one bag off the bike rather than the complete suite of panniers. The Sentier Trailer/Trolley (above) even has a retractable handle and trolley wheels built-in!

Bike Trailer Design

Axle Mount
The rear axle is the most common mounting location and is often the quickest for trailer installation and removal. Despite what you may be thinking, trailers put a surprisingly low-stress on bike frames. Got a 12mm rear axle? Check out The Robert Axle Project.

Seatpost Mount
The key advantage of seatpost mounting trailers are that they offer a tighter turning circle as they pivot closer to the front of the bike.

Single Wheel vs. Two Wheel
You’ll notice that most bicycle touring trailers listed are single wheel. This is because they are generally narrower, lighter, have a lower rolling resistance, are more manoeuvrable (as they lean with the bike), have one less wheel to puncture and can better avoid potholes. Two wheel trailers tend to be better for around town as they’re easier to load and are more stable at low speeds.

Foldable
Some trailers have been designed to fold into a small package so that you can pack them away into a bike box with your bike.

The Aevon KIT L80 folds for plane travel.

Weight

One of the reasons people avoid trailers is due to their weight. But you may find that the true weight difference is quite negligible.

For example:

Ortlieb F+R 65 litre Pannier set – 3500g
Tubus F+R Steel Rack set – 1000g
Total = 4500g

Free Parable 75 Litre Drybag – 1200g
Free Parable T2 Trailer – 3600g
Total = 4800g

When comparing like-for-like in terms of storage and waterproofing, there’s no doubt that trailers add a bit of weight. But it’s probably not as much as you’d think: it can be as little as +300g over a set of racks and panniers. To put this weight into perspective, I’ve determined that a kilogram is worth no more than a few seconds on a hilly day of bicycle touring.

Criteria for the Best Bike Trailers For Touring

Under 10kg / 22lb
You already lug around enough weight when you’re bicycle touring. I’ve capped the trailer weight to 10kg because the below trailers have an adequate carrying capacity of 30kg+.

Reputation
Almost all of the below trailers have been tested extensively by bicycle tourers around the world. I’m happy to add other options if enough people have firsthand experience with other bike trailers.

Ok, let’s take a look at the best bike trailers for bicycle touring!

Adventure CT1 Bike Trailers

bike trailers

Adventure CT1 bike trailer.

Adventure Outdoor Co. make this single wheel bike trailer which can fold flat for storage or plane travel. The rather affordable CT1 is supplied with a large drybag and flag to get you on the road without fuss. A recommendation by users is that the low-quality rear tyre is replaced for something a bit harder wearing.

Weight – 6.5kg / 14.3lb
Capacity – 35kg / 77lb
Price – £249

Aevon KIT L80 Bike Trailers

bike trailers

Aevon KIT L80 bike trailer.

Aevon are well-known in Europe for producing some of the best bike touring trailers. The KIT L80 is their lightweight option which can actually fold quite flat given the lack of frame; great news for those who travel with planes. All of the Aevon trailers use a seatpost mount making them quite manoeuvrable as they pivot from a mid-point on the bike. Up the back is an adjustable air shock to dampen vibrations on rougher surfaces.

Weight – 5.5kg / 12.1lb
Capacity – 35kg / 77lb
Price – 755€

Aevon STD 100 Bike Trailers

bike trailers

Aevon STD 100 bike trailer.

The STD 100 is the biggest and most heavy-duty Aevon trailer option.  It can carry an additional 20 litres and 10 kilograms over the KIT L80 and still incorporates the shock for off-road use. With the STD 100, there’s also a more substantial side frame for additional drybag support.

Weight – 7.0kg / 15.4lb
Capacity – 45kg / 99lb
Price – 695€

Aevon UNO 100 Bike Trailers

bike trailers

Aevon UNO 100 bike trailer.

The UNO is the low-cost Aevon model designed for road-only use. The UNO omits the rear shock which generally isn’t necessary on smooth surfaces. This model will still carry the same 100 litre drybag as the STD.

Weight – 7.0kg / 15.4lb
Capacity – 35kg / 77lb
Price – 355€

BOB Ibex Bike Trailers

bike trailers

BOB Ibex bike trailer.

BOB bike trailers have got to be the most popular option for bicycle touring due to their relatively low cost and good build quality. The Ibex model employs a coil shock to reduce vibrations and make it more suitable for off-road use. All BOB trailers use axle mounts to make connecting and disconnecting a breeze.

Weight – 7.7kg / 17.0lb
Capacity – 32kg / 70lb
Price – US $409

BOB Yak Bike Trailers

bike trailers

BOB Yak bike trailer.

The BOB Yak is the most affordable model in the BOB trailer range. The side frames do a good job of supporting the big BOB drybag and up the back is a tight fitting fender to keep everything clean.

Weight – 6.1kg / 13.4lb
Capacity – 32kg / 70lb
Price – US $329

Burley Nomad Bike Trailers

bike trailers

Burley Nomad bike trailer.

The Burley Nomad is one of the only two-wheel trailers on the list. The magic of this trailer is that it folds flat for travel, or alternatively you can remove the wheels and check-in the trailer as a separate piece of baggage. The Burley Nomad actually works out to be competitive in weight, price and still offers a huge carrying capacity.

Weight – 6.5kg / 14.3lb
Capacity – 45kg / 99lb
Price – US $339

Extrawheel Bike Trailers

bike trailers

Extrawheel bike trailer.

The Extrawheel trailer is unique in design as it creates a second rear rack for two additional panniers. It has a much larger wheel than most trailers which allows it to float over uneven terrain in a more efficient manner than many of the others listed here. The Extrawheels come in multiple wheel wheel sizes: 26″, 29″ or 700c.

Weight – 4.8kg / 10.6lb
Capacity – 35kg / 77lb
Price – US $299

FarFarer Bike Trailers

bike trailers

Farfarer bike trailer.

The USA-made FarFarer is a seatpost mounted option that’s ultra versatile given its seatpost mount and small turning circle. It uses a hammock-style bag to carry goods which unfortunately isn’t waterproof like the rest of the options. The most impressive feature is the ability to sling the trailer over your handlebars for technical sections of trail.

Weight – 4.5kg / 9.9lb
Capacity – 35kg / 77lb
Price – US $550

Free Parable T2 Bike Trailers

bike trailers

FreeParable T2 bike trailer.

The Free Parable T2 is the lightest trailer listed with the smallest fold and the smallest wheel (perhaps less suitable for off-road use). The T2 uses a series of ‘ribs’ under the 75 litre drybag to keep the bag stable and the weight down.

Weight – 3.6kg / 7.9lb
Capacity – 30kg / 66lb
Price – US $645

Maya Bike Trailers

bike trailers

Maya Cycle bike trailer.

The Maya Cycle Bike Trailer is the cheapest trailer on this list. The construction quality isn’t quite to the same level of the other options, but from all reports it still does a great job. Unfortunately, it doesn’t use a drybag so you’ll need to ensure your gear is in waterproof bags.

Weight – 5.9kg / 13.0lb
Capacity – 30kg / 66lb
Price – US $249

Radical Design Cyclone IV Bike Trailers


bike trailers

Radical Designs Cyclone IV bike trailer.

The Radical Design Cyclone is the lightest two wheel trailer on this list. It uses better quality materials than the Burley Nomad, but this is of course reflected in the price. Like other two wheel designs, it folds flat and can be checked onto an aeroplane is baggage. The bag isn’t waterproof, but the trailer is instead provided with a raincover.

Weight – 5.5kg / 12.1lb
Capacity – 40kg / 88lb
Price – 549€

Topeak Journey Bike Trailers


bike trailers

Topeak Journey bike trailer.

Renowned bike component manufacturer Topeak makes one of the only sub-5kg trailers. Using aluminium instead of steel, they’ve managed to shave off 15-30% when compared to similar designs. The Topeak drybag is designed specifically for the trailer, strapping in at multiple points along the frame.

Weight – 4.9kg / 10.7lb
Capacity – 32kg / 70lb
Price – US $499

Tout Terrain Mule Bike Trailers

bike trailers

Tout Terrain Mule bike trailer.

Tout Terrain may be famous for their touring bikes, but they also make a touring trailer called the Mule. The seatpost mount provides a tight turning circle and the air shock takes the edge off bumps on rough roads. The complete package is comparable in weight (and price) to the Aevon Kit L80.

Weight – 6.7kg / 14.8lb
Capacity – 45kg / 99lb
Price – US $700

Weber Monoporter Bike Trailers

bike trailers

Weber Monoporter bike trailer.

The Weber Monoporter is another trailer option that folds flat. Its name is derived from the fact that the wheel attaches from just a single side. This trailer works out to be quite lightweight too as it doesn’t use a side frame to stabilise the bag on the sides.

Weight – 5.7kg / 12.6lb
Capacity – 25kg / 55lb
Price – US $549

Sentier Bike Trailers / Trolleys

bike trailers

Sentier bike trailer / trolley.

The soon to be released Sentier is the only convertible trailer/trolley option. Within 23 seconds you’re able to convert your trailer into a travel trolley and vise versa. The only downside to this design is the additional weight; it works out to be about 25% heavier than a BOB trailer and drybag.

Weight – 9.0kg / 19.8lb
Capacity – 30kg / 66lb
Price – 549€

Have You Had Any Experience With One Of These Trailers?

The post The 16 Best Bike Trailers for Bicycle Touring appeared first on CyclingAbout.

Long Term Bikepacking Bags Test: Ortlieb Handlebar Pack Review

$
0
0

I was pretty excited when Ortlieb announced they were dropping a line of bikepacking bags, after all, this is a brand that has been innovating waterproof panniers since the 1980s. Ortlieb are renowned first and foremost for their durability. I’ve got some Backroller panniers with over a decade’s wear and tear including 2+ years around the world. Although they’re not looking super sharp today, I’ve managed to keep them alive with only a handful of spare parts.

The Ortlieb bikepacking set includes a 16-litre seat pack, a 6-litre frame pack, a 3.5-litre accessory pack and the handlebar pack on review here. All models are made using a PU-coated nylon fabric which is lightweight, waterproof, PVC-free (no petroleum used) and rather abrasion resistant. It seems that Ortlieb have cut no corners with regards to materials, parts and fittings – they’re all A1 quality across the board.

I’ve been thrashing the Ortlieb Handlebar Pack about for five months now, including two solid weeks on the Munda Biddi Trail. I’m now confident that these bags are the real deal. Let’s take a look at the intricacies of Ortlieb’s first bikepacking bags!

The Ortlieb Handlebar Pack in Numbers

15 Litres / 915 cu.in
60cm / 23″ Wide
417 Grams / 14.7 oz
US $135

Design Details

Let’s start with the attachment system for this handlebar drybag. Ortlieb use a two-step mounting process which makes it easier to get your pre-packed bag on the bars. Rather than trying to support the bag weight AND find the buckles with your other hand, a velcro strap system is used as the first step in connecting your bag to the bar. It’s not essential that these velcro straps are taut, you’ll just need them to grab either side of the stem so that you can have two hands free for the second step.

The second step is the connecting of the orange straps and buckles. This is really easy to do given you’re no longer supporting the drybag’s weight. The fasteners are located in front of the handlebar, so just pull the orange straps back towards you until you achieve your desired tension.

Like most bikepacking bags, the Handlebar Pack does interfere with your cabling. The worst-case scenario is that you may need to increase the length of your cables, or change the routeing in order to keep them as friction-free as possible. I didn’t find either of those necessary with my bikes. You’ll definitely want to use a heavy-duty tape at the rub points to prevent the bag from scratching at your paintwork.

Ortlieb Handlebar Pack

Included are four foam spacers which sit between the handlebar pack and your handlebar. These foam spacers are excellent for two reasons: they provide a physical distance between the tops of a road handlebar and your hands, and on a flat handlebar they create enough space to clear your brake levers. I’m rather surprised that many other mainstream bikepacking bags do not include spacers like this. A side benefit that I’ve found is that my brake and gear cables can filter through the foam spacers. This seems to prevent cable kinks and keeps my shifting nice and crisp.

Ortlieb Handlebar Pack

The third stabilisation point is at the headtube. There are three possible loops on the back of the bag which you can select, depending on your bike setup and size. To increase the gap between the handlebar bag and your front tyre, I’ve found that you can velcro up to the middle of the head tube or even around the stem to give it a few centimetres ‘lift’. The only downside seems to be that the bag will wiggle around a little more due to having less overall support.

The Ortlieb Handlebar Pack employs a roll closures on either side. This means you can essentially select how large you want the bag to be based on what you’re carrying. Roll the ends as many times as you need, give them a clip and you’re done. I found myself only opening one side for the most part as I always pack and repack my gear in the same order.

One thing to consider with this bag is whether it will fit your bike. With a short headtube and a close distance between your handlebar and front wheel, the Ortlieb bag may have a diameter too large for your bike. Unfortunately, the bag is only available in one diameter – 20cm – which is the equivalent of the largest Revelate handlebar roll. In comparison, the smallest Revelate bag provides an additional 3cm clearance from the wheel (6cm smaller in overall diameter).

Ortlieb Accessory Pack

I found the Ortlieb Accessory Pack (3.5L / 207g / US $75) to be a brilliant addition to the Ortlieb Handlebar Pack. When this bag came out last year, my initial thoughts were that it was unnecessary given the quick access stem and frame bags on offer. But despite preferring stem bags for feeding while riding, I enjoyed having bulky foods like apples, bananas, bread and soft drink cans in the Ortlieb Accessory Bag. It was generally big enough to store a days worth of food, plus my rain jacket. I’d say I accessed this bag more than any other for most of my bikepacking trips – it’s super handy.

The Ortlieb Accessory Pack clips onto its bigger sibling using the four purpose-made hooks of the Handlebar Pack. These hooks each have a tension point which allows you to adjust the height of the bag on the front of your bike, and thus prevent it from drooping into your front wheel.

There are velcro straps built into the Accessory Pack so that you can mount it directly to your handlebar too. While I appreciate the additional versatility of this design detail, I feel like these straps could’ve easily been removable. It’s not a big deal, but they are probably surplus to most people’s needs.

The Ortlieb Handlebar Pack on Road Handlebars

Ortlieb Handlebar Pack

The Ortlieb Handlebar Pack will fit nicely to a road handlebar. The major downside to drop bars is that you’ll lose about half the bags capacity, bringing the Ortlieb bag to about 7-8L. This is another argument for using the Accessory Pack, as it boosts your storage back up another 3.5L in a conflict-free location.

Again, I must mention that the foam spacers are a godsend for road handlebars as they create room for your hands on the tops. I don’t know why all handlebar packs don’t afford this detail.

Conclusion And How This Bag Could Be Better

Ortlieb have nailed it the first time with the Handlebar Pack and Accessory Pack – they’re good. Properly good. A standard to beat! I’ve been really happy with the materials, design and quality of these bags. They’re stable, waterproof and easy to fit.

There are a few things that could be improved, however.

I’d like to see a smaller size option (14-15cm diameter) so that riders with less handlebar-to-wheel clearance can still use them. I’d love to see a few colour options as the grey and orange won’t suit every bike. Another idea that would reduce brake and shift cable interference is a handlebar cradle. This stabilisation system is weight limiting, heavier and more annoying to switch between bikes, but I think Ortlieb could work with something here. Actually, I’d be surprised if we didn’t see an Ortlieb model that used this system in the coming years.

Disclosure: The Ortlieb Handlebar-Pack and Ortlieb Accessory-Pack were provided for this review.

The post Long Term Bikepacking Bags Test: Ortlieb Handlebar Pack Review appeared first on CyclingAbout.

Ortlieb Seat Pack Review: Long Term Bikepacking Bags Test

$
0
0

I was pretty excited when Ortlieb announced they were dropping a line of bikepacking bags (including this Ortlieb Seat Pack). After all, we’re talking about a brand that has been innovating waterproof panniers since the 1980s.

Ortlieb are renowned first and foremost for their durability. I’ve got some Backroller panniers with over a decade’s wear and tear including 2+ years around the world. Although they’re not looking super sharp today, I’ve managed to keep them alive with only a handful of spare parts.

The Ortlieb bikepacking set includes a 15-litre handlebar pack, a 6-litre frame pack, a 3.5-litre accessory pack and the seat pack on review here. All models are made using a PU-coated nylon fabric that is lightweight, waterproof, PVC-free (no petroleum used) and rather abrasion resistant. It seems that Ortlieb have cut no corners with regards to materials, parts and fittings – they’re all A1 quality across the board.

I’ve been thrashing the Ortlieb Seat Pack for five months now, including two solid weeks on the Munda Biddi Trail. I’m now confident that this saddle bag is the real deal.

Head HERE to read my review of the Ortlieb Handlebar Pack.

The Ortlieb Seat Pack In Numbers

8-16.5L / 488-1007 cu.in
430g / 15.2 oz
64cm / 25″ long
US $160

The Design Details

Ortlieb Seat Pack

The Ortlieb Seat Pack offers an aggressively tapered shape in order to maximise the bag’s volume. The 16+ litre seat pack widens after the saddle to balloon to 25cm by the bag’s end. But this doesn’t mean it will have a noticeable presence between your legs. The Seat Pack is surprisingly narrow under the saddle for such a large bag. The bag’s profile in combination with an internal structure does the trick at eliminating leg rub.

The seatpost straps are easy to wrap around an array of post diameters. But while the straps have been rubberized to increase grip and minimise rub, I’ve still found that they scuff your seatpost over time. I’d recommend applying a little tape to your post before using any kind of saddle bag.

The Ortlieb bikepacking gear is all 100% waterproof, buying you a peace of mind that you may not get with other bags. A particularly good thing about waterproof bags is that you don’t need individual stuff sacks for items like sleeping bags or tents. Just shove them all in and off you go!

Ortlieb Seat Pack

Due to the waterproof nature of the Ortlieb Seat Pack, a ‘purge valve’ has been installed on the left-hand side to move air out of the bag while you’re compressing it. It’s a really cool feature in theory, but I only found the purge valve to be useful half the time. The other half it was obscured by the objects I was packing into my bag.

Ortlieb Seat Pack

The Ortlieb Seat Pack is impressively large – it’s definitely the biggest saddle bag I’ve ever played with. Despite its 64cm total length, the roll-style closure allows you to dictate the bag’s volume. But large bags like this do come with drawbacks. In order to get enough strap compression, the Ortlieb Seat Pack needs to be filled tight to about 2/3 of its overall length (about 8-10 litres). If the bag isn’t packed well or strapped appropriately, it will ‘wag’ about (more below).

Installing the Ortlieb Seat Pack

Ortlieb Seat Pack

The Ortlieb Seat Pack is one of the easier saddle bags to install onto your bike. This can be put down to the ultra-pliable seat strap material which is easily directed up and over the seat rails. In comparison, other manufacturers use rather rigid straps that make installation a bit more tedious – especially while wearing gloves.

I’ve found that the best way to install a saddle bag is to stand behind the bike and grab the rear wheel with your knees. You can then wedge the saddle bag between your chest and the seatpost while you connect the seat rail clips and seatpost straps. The forward pressure is normally enough to make sure the bag stays still.

As the seatpost straps are really long and versatile, the only thing to consider is if you have enough seatpost real estate. This bag requires about ~17cm (7 in) of seatpost to get a good fit. Like many of Ortlieb products, spares are of course available for this bag. The seat rail straps will take a beating and it’s nice to know that they’re replaceable in the long-term.

Very Little ‘Tail Wag’

Ortlieb Seat Pack

The Ortlieb Seat Pack features a high-density plastic ‘stiffener panel’ to create an internal skeleton of sorts. At the seatpost straps, the bag is bolstered further with two metal brackets that prevent bulging. This simple plastic and metal structure results in one of the most laterally stable bikepacking saddle bags I’ve had the pleasure of using. That is providing you fill it with enough stuff (~8 litres).

But the bag won’t do all the work for you; it will still need to be packed well. By loading tight, form-fitting gear into the bag first (eg. clothing or a sleeping bag), the section nearest the seatpost will be as rigid as possible. It’s best not to load heavy objects at the very rear of the bag for obvious reasons.

Conclusion and How It Could Be Improved

Ortlieb Seat Pack

The Ortlieb Seat Pack is very well made product. It’s waterproof, easy to fit and durable. The ‘stiffener’ panel and metal brackets do a great job of stabilising the bag provided you’ve packed it well and put enough tension through the straps. The fact that some of the bag’s components are replaceable ensures you’re making a good investment here.

My criticisms are mostly around the fact that it’s only available in one size. A smaller size would sure be welcomed as not everybody wants their gear high and towards the rear of the bike. From what I understand, Ortlieb should have a smaller size available soon. The other thing I’d love to see is a different colour option!

Disclosure: The Ortlieb Seat-Pack was provided for this review.

The post Ortlieb Seat Pack Review: Long Term Bikepacking Bags Test appeared first on CyclingAbout.

All About The Best Chain Lube For Touring Bikes

$
0
0

Chain lube is the key to having an efficient, fast-shifting, long-lasting drivetrain. Companies around the world spend millions researching the best chain lube formulations that help increase efficiency, attract less grit and last a really long time.

While some people swear black and blue that ‘x’ chain lube is the best, you can afford to be less picky. All chain lubes work well, but the advantage of the formulated lubes is that they’ll do it better.

Let’s take a look at the different types of lube, how it works, how to apply it and the best chain lube products.

best chain lube

How Does Chain Lube Work?

Chain lube is applied externally but is actually only necessary internally on the chain pins, rollers and surfaces between the inner/outer chain plates. As it needs to penetrate the chain, the lube should be thin enough to access the small chain components but then thick enough to last a decent amount of time. This is why many thicker automotive lubricants are not the most suitable option for your bike.

The most important thing about lube is really just making sure you’ve got an adequate amount on your chain at all times. This will allow your drivetrain to last longer and be more efficient. It’s worth noting that chain lube is not necessary on any other drivetrain parts (cassette, chainrings, derailleur etc). I guess it’s called chain lube for a reason!

best chain lube

Dry, wet and wax lubricants.

Types of Bicycle Chain Lube

There are two main types of chain lube; wet and dry, and both can be optimised to work well in different conditions. In general, a wet lube is better for the muddy/wetter stuff and a dry lube is better for dry conditions. It can be said that you’ll need to strike a balance between lube longevity and how much of a mess the lube makes on your drivetrain!

Dry Chain Lube
Thin-bodied dry lubes attract very little dust and grit, but will need to be applied regularly. Given how clean dry lubes leave your chain, I’ve found that they’re useful for cleaning your chain too. Just apply a coat of lube liberally, spin the cranks backwards a few times and wipe off the excess. Dry lube (plus a regular wipe-off with an old sock) is my preferred setup for bicycle touring.

Wet Chain Lube
Gluggy wet lubes attach a film that stays on your chain, attracting grit and making your drivetrain look rather nasty. But despite the poor way I’m selling it, wet lube is awesome because it can last upwards of 1500km (1000mi) in the rain, mud… whatever you like. I recommend using a degreaser between applications to ensure that you’ve removed all grime the wet lube has collected on your drivetrain.

Wax Chain Lube
Wax chain lubes dry onto your chain, attracting very little grime and grit, and will even shed excess dirty wax during use. These lubes are often known to be the fastest too, decreasing friction across your drivetrain by a minute amount. The major downsides; they need to be applied more regularly than other lubes, they’re not great in wet conditions, and you’ll want to de-grease the wax off your chain every now and then too.

best chain lube

Using an old sock to clean my chain with a generous application of lube.

Which Lube Type is Best For You?

It’s all about matching your chain lube to your use.

Wet lubes are fantastic for long mileage, especially in adverse weather conditions. They are also great for people who are less likely to remember to lube their chain regularly! Dry lubes on the other hand, are suited to people who prefer a clean drivetrain and are happy to maintain it regularly.

best chain lube

Wet chain lube lasts a long time but is very messy. This is my drivetrain after just 150km (100mi) in dry conditions!

How To Apply Chain Lube

It’s best to start with a clean, dry chain surface. I prefer to use a citrus-based degreaser for this process. You might need to find kerosene or mineral spirits if you’re on a bike tour somewhere.

– Shift into the big ring at the front, and the small cog on the back.
– Apply a generous layer of lube on your chain.
– Spin your drivetrain backwards for about 30 seconds.
– Wipe off the excess lube because you only need the lube between the chain links.
– Let it sit overnight in order for the lube to penetrate the inner chain pins and rollers (if you can).

best chain lube

The Best Chain Lube Brands

The Best Chain Lube – Dry
– I like Prolink as it often lasts long enough for two long road rides, or a day in the dirt. Cleaning it off is exceptionally easy.
Boeshield T-9 is another thin lube, but with the added benefit of a bit of wax.
Rock “N” Roll The Gold is another very popular lube with a touch of wax that tests well.

The Best Chain Lube – Wet
– I like the Finishline Wet lube. It’s my go-to anytime it rains or I’m encountering mud.
– One lube that gets raving reviews is the Chain-L product. Some users claim 1500km (1000mi) between applications.
Rock “N” Roll Extreme has a pretty loyal following for its longevity, and tests well in terms of efficiency.

The Best Chain Lube – Wax
– I like the Squirt product. It is 100% biodegradable, it sheds over time, and it’s known to be the fastest lube available.
Pedros Ice Wax 2.0 has very similar properties to Squirt.

The post All About The Best Chain Lube For Touring Bikes appeared first on CyclingAbout.

What’s The Speed Difference Between Touring Tyres? Rolling Resistance Lab Testing

$
0
0

Bicycle Rolling Resistance is a website that conducts lab testing of bike tyres. They focus mostly on rolling resistance but also test the puncture resistance of the tread and sidewalls. We are fortunate enough to have data available of 17 different touring tyre models to examine.

rolling resistance

How Is The Tyre Rolling Resistance Tested?

Tyres are tested on a 77cm steel drum which is covered with diamond plate to simulate an average road surface. An electric motor spins the drum to 200 RPM (29 km/h or 18 mph) with a tyre and 42.5kg load resting on it. A microcontroller calculates the average power required to keep the drum at 200 RPM over a period of 30 seconds. A correction is made for the electric motor efficiency. The test is conducted three times and the average of the three is the rolling resistance of the tyre.

rolling resistance

Is This Form of Resistance Testing Legitimate?

Steel drum testing is not perfect, but it’s able to get consistent results. This is because wind speed, temperature, power input and rolling speed can be controlled to a very high level of accuracy.

My only concern is with regards to the correlation between tyre pressure and rolling resistance. A steel drum indicates that higher pressures equate to lower rolling resistance. But this has been largely disproven on the road.

The thing that drum testing doesn’t take into account is vibrations. The folk at Bicycle Quarterly have essentially found that vibrations slow you down when your tyres cannot deform adequately. We’re talking about tyres that are running very high pressures or tyres with stiff sidewall casings (or both). If a tyre cannot deform over a bump, our bodies absorb most of this energy and we slow down. If the tyre can deform over a bump, the energy is temporarily stored in the tyre then released once you’ve travelled over it.

With this in mind, we should look at the rolling resistance figures while somewhat disregarding the tyre pressure trends. Let’s focus on the rolling resistance difference between each of the tyres at the 45 or 60psi pressures.

rolling resistance

Analysis

The results show that there is a great difference between the fastest and slowest tyres. The tyre with the highest rolling resistance was 95% slower (32.6w) than the tyre with the lowest (17.1w)! Even between the first and fifth fastest tyres, there was a 25% difference in energy loss. That’s enough to lose you a fair bit of time on a long day.

The king of this rolling resistance test is the Schwalbe Almotion. This is despite it being heavier than nine other touring tyres, suggesting that tyre weight isn’t necessarily a big factor. The key to the tyres success seems to be more to do with the composition. In this case, the Almotion uses the same rubber compound as their fastest Schwalbe road racing tyre.

There didn’t seem to be a strong correlation between puncture resistance and speed either. If we take the top-8 and bottom-8 puncture resistance scores and average them, the tread protection is only 2 points higher in the bottom-8 (15 vs 13) while the sidewall protection is the same (5 vs 5). There isn’t a great difference in average tyre thickness either. The average for the top-8 is 5.28mm and the average for the bottom-8 is 5.98mm.

rolling resistance

The rubber composition of tyres seems to reduce rolling resistance the most. Image: CycleTyres.Fr

What Is The Difference in Cycling Speed Between Tyres?

Rolling resistance on a touring bike is particularly important when compared to faster travelling bikes, like a road bike. This is because aerodynamics play a reduced role in a touring bike’s overall speed. The speed difference between slow and fast rolling tyres is very significant – in fact, it may surprise you that the effects of weight pale in comparison.

Comparing the Schwalbe Almotion and Schwalbe Mondial there is 19.2w of extra resistance overall (two tyres). This translates to about 1.49km/h (0.93mph) slower travelling speeds on the Mondials with all things being equal (150w, 85kg total weight, flat road). Knowing the speed difference, we can determine the time differences over the course of a typical touring day using Bike Calculator*.

On A Flat 100km Route (0% Gradient)
Over 100km, the 1.49km/h drop in speed from the Mondials will add 11 minutes and 49 seconds to your cycling time (5.4% slower). To put that into perspective, carrying 30kg (66lb) extra on your touring bike would add 7 minutes to your ride time (3.2% slower) over 100km.

On A Hilly 100km Route (10km up, 10km down x5 @ 2% Gradient)
Assuming it’s hilly, rolling resistance plays an even greater role because of the lower travelling speeds. The slower Mondials add 18 minutes to your cycling time (7.0% slower). To put that in perspective, carrying 20kg (44lb) extra on your touring bike would add 17 minutes to your ride time (6.8% slower) over 100km.

*Through my weight testing, I’ve determined Bike Calculator to be close to accurate.

Low rolling resistance tyres can offer the same time savings as 20kg less bike weight on moderately hilly route.

Does Tyre Speed Really Matter?

If speed is your aim, stop thinking about how to shave a kilogram off your kit and start looking at fast tyres.

The rolling resistance difference between our two examples can be equated to adding 20kg or more to your bike. It can be just as significant as the aerodynamic benefits of bikepacking bags over panniers. That’s a lot!

Yes, I know that touring isn’t really about speed. But if you can travel 5-7% faster using the same amount of effort, how is that not a good thing? Even if you don’t care for the increase in speed, you’ll be able to travel every day with less effort. That will leave you with more energy by the day’s end.

Rolling resistance can contribute to the same speed difference as the aerodynamic benefit of bikepacking bags over panniers.

A Few More Thoughts On Tyres

Alee, the rolling resistance savings are huge! Should I swap my tyres?
Not necessarily; rolling speed is only one factor in the tyre equation.

You will want to match the tyre width and tread pattern to the terrain you ride. If dirt roads are your jam, you’ll want wide tyres with tough sidewalls and a bit of tread. The looser, rougher and more rocky, the more tread will be required. If you’re on the road, then the low resistance tyre options from Schwalbe, Vittoria and Continental look to be excellent.

For touring you may also want a tyre that is durable and long lasting. If you’re completing a long tour, it’s nice having tyres that go and go and go. I have managed to squeeze 25,000km out of my Schwalbe Marathon Mondial tyres. I can only guess that the Schwalbe Almotion is not capable of this kind of mileage.

Wanna help support CyclingAbout? Grab some tyres from Amazon by using the links below & CyclingAbout gets a tiny bit from each sale. No cost to you, easy as pie!

Schwalbe Almotion $54
Vittoria Voyager Hyper $49
Schwalbe Marathon Supreme $74
Continental Sport Contact II $34
Schwalbe Marathon (Greenguard) $33
Schwalbe Marathon Plus $47
Schwalbe Marathon Mondial $75
Vittoria Randonneur $30

Head HERE To See My Weight Testing and HERE To See My Aerodynamic Testing

The post What’s The Speed Difference Between Touring Tyres? Rolling Resistance Lab Testing appeared first on CyclingAbout.

Folding Bike Holiday To Sri Lanka: 5kg Gear List

$
0
0

Today I’m off to explore Sri Lanka on my origami bike! I’m taking with me a good friend who has very little cycling experience, and therefore we’ve decided to do a folding bike holiday. We’ll be using public transport to get from A to B, but then folding bikes for everything in between. Our main objective is to see how using a folding bike can enhance the travel experience.

The expected temperature range is between 14-32 degrees celsius (57-90f) so we’re able to pack quite light when it comes to clothing. We’ll be in hotels and guest houses and won’t be needing any camping or cooking gear.

We each have a set of running shoes so that we can do some hiking up Adam’s Peak (Sri Pada) and through various national parks around the island. We’ll probably be more active on our feet than on the bikes!

The bikes we’ve chosen are Brompton M6L folders. You can fold these right up in about 15 seconds and they have a really small pack size (585mm x 565mm x 270mm / 23″ x 22.2″ x 10.6″). To get up and down the hills of Sri Lanka we have six wide-range gears to choose from. The origami bike is finished off with fenders to keep us dry, and a front-mounting C-Bag to carry all of our luggage.

You’ll be able to follow my folding bike holiday over the next three weeks on Facebook or Instagram.

folding bike holiday

Clothing: 2007g
Casual Shirt x2 – 400g
Thermal Layer – 200g
Quick-dry Shorts – 130g
Underpants x2 – 80g
Socks x2 – 50g
Sandals – 587g
Running Shoes – 430g
Rain Poncho – 130g

Toiletries: 330g
Toothbrush – 20g
Toothpaste – 40g
Deodorant – 50g
Sunscreen – 50g
Electric Shaver – 170g

Camera Gear: 1000g
Panasonic Lumix GH4 Camera + Lenses – 750g
Rode Lavalier Microphone – 20g
100gb+ of SD Cards – 5g
Camera Charger and Batteries – 200g
Airstash Card Reader – 25g

Tools, Spares, Essentials: 990g
Phone + Charger – 150g
Wallet – 50g
Sunglasses – 30g
Pump – 50g
Multitool – 130g
Spare Tube – 90g
Helmet – 220g
Lights – 80g
Chain Lube – 30g
Bidons x2 – 100g
Passport – 60g

Bag: 1310g
Brompton C-Bag – 1310g

Gear Total: 5637g

Brompton M6L: 12200g

The post Folding Bike Holiday To Sri Lanka: 5kg Gear List appeared first on CyclingAbout.

You’re Doing It Wrong: Hills Are NOT Harder Than Cycling On The Flat

$
0
0

People tell me all the time about how much they struggle in the hills. And that makes sense, right? You have to move your heavy touring bike and all your gear up a steep road, requiring LOTS of hard pedal pushing along the way.

Actually, that’s simply not true.

If you struggle in the hills, you’re doing it wrong. Let me explain.

Power is Power

The amount of ‘power’ or ‘effort’ that you put into the pedals can be measured in watts. We can measure this power using strain gauges built into bike components like the cranks, pedals and the rear hub.

When you ride up a hill and you’re pushing 150 watts, that is the same 150 watts as when you’re cycling on the flat. The difference is that 150 watts on a climb simply translates into a slower speed due to the effects of gravity. You’re not actually working any harder. It’s the same amount of effort!

In the last few years, power meters have become available to recreational cyclists due to advancements in technology, competition between manufacturers and lower costs. While I don’t deem them necessary on a touring bike, my experience using them has allowed me to get a feel for what different rates of power should feel like on different types of terrain. You can do a spin class at the gym to get a feel for the kind of power you can sustain over certain time periods.

This is the power meter that I used for my weight and aerodynamic testing.

Using Mechanical Advantage To Make Hills A Breeze

By using the right low gears efficiently, you can pedal at the same revolutions per minute AND push the same amount of power into the pedals on most road gradients (within reason, let’s say up to 15%). That’s why I’ve calculated the low gears for you to compare on every touring bike in my book, and it’s also why I advocate for appropriately low gears on touring bikes in general.

Let’s look at how you can make your effort the same, no matter the gradient.

Are Your Gear Ratios Too High?
Do you already go up hills in your lowest gear and still find them really hard? Well, your lowest gear probably isn’t low enough. When your pedalling speed (cadence) is low, you fatigue your leg muscles (mostly quads) more, and utilise your heart and lungs less. The opposite is true when your cadence is high. An efficient pedalling cadence for the hills starts at about 60rpm. Anything below that and you’ll really start to feel the effects of fatigue on your muscles.

Gear Inches
We can measure low gears by equating them to gear inches. With this information, we can then compare bikes with different wheel sizes and drivetrain setups. The lowest gears to fit on touring bikes are between 14-15″. That equates to a 4.1-4.3km/h climbing speed at 60rpm, which is about the slowest you can go without losing your balance.

Example: A bike with 700x38c tyres, a 24t front chainring and a 36t cassette cog has an 18.2″ gear ratio. Once we know this, we can calculate that at 60rpm you’ll be travelling at 5.2km/h (3.3mph). We can then use BikeCalculator to determine how steep the climb can be in order to maintain 60rpm @ 5.2km/h. Provided the rider is 70kg, the bike/gear is 25kg and they’re pushing 150w, they can ride up a 10% gradient climb without any drop in their cadence. More on gear ratios HERE.

Stop Pushing So Hard!
This is a classic cyclist manoeuvre. Spin along on the flat, taking it real easy because you can, then BAM – you go up a hill and ramp up your effort. This is 100% unnecessary and will result in the fatigue of your muscles, cardiovascular and respiratory systems. Unless you’re training for an event, the idea is that you sustain an even amount of effort throughout your ride. You can roughly measure your effort by how heavy you’re breathing. If you’re panting away, drop into a lower gear and take it easier. It’ll work out more sustainable, I promise. 🙂

hills

Fitting lower gear ratios to a road bike drivetrain.

I Get It, But Why Do Hills Always Feel Harder?

You Cannot Coast
With gravity taking a cut of your momentum, your speed will dramatically reduce when you stop pedalling. In order to overcome this, you’ll want to be pushing your pedals at an effort that is sustainable from the bottom to the top of a climb.

Less Air Cooling
At slower travelling speeds, you aren’t getting the same evaporative cooling effects as faster speeds. That means you’ll want to employ other methods to cool yourself down. I can recommend pouring water over your head, neck and forearms. You should also make sure you wear lots of sunscreen, or alternatively cover yourself up as sunburn will contribute to fatigue and increased fluid needs.

Altitude
If you’re cycling over 2000m (6000ft), you will notice that it’s harder to breathe. This is because there is less oxygen available in the air. Cycling at altitude is harder both on the flat and in the hills!

The Crank Deadspot
At the point of the pedalling phase where you have the lowest leverage on the cranks (6, 12 o’clock), your speed momentarily slows. The rate of deceleration is greater when cycling uphill due to the additional effects of gravity on your momentum. That said, the ‘real world’ change in your speed and momentum is minimal at most cycling gradients (undetectable on a bike computer) and can be overcome by switching to an even lower gear (higher cadence). The times when Crank Inertial Load is most relevant is when your cadence drops significantly because you haven’t got a low enough gear (eg. 30-40 RPM). You can read a study on this topic HERE.

There Are A Few Things In Your Favour When Climbing

Lower Rolling Resistance Of Your Tyres
The amount of energy lost through your tyres is proportionate to your speed. That means that when travelling half your normal speed, your rolling resistance is also cut in half, making your bike move more efficiently on the road.

Lower Aerodynamic Drag
Due to the slower travelling speeds on a climb, the effects of wind drag are greatly reduced. That means more of your power can be used for other things like overcoming gravity. It also means that there is little aerodynamic advantage when using bikepacking bags over panniers.

Scenic Views!
When you head into the hills, you get to see the world from up above. How rewarding is that?

vegan travel

I completed over 30000m of elevation over two weeks in Vietnam. It was slower but not necessarily harder than my flat tours.

Make Hills Easy: My Advice

Ease Up and Measure Your Effort
Take it easy when starting to climb. Measure your effort by how heavy you’re breathing when you ride. Slow down your speed by slipping into a lower gear when you feel your body working hard.

Keep Up Your Pedalling Cadence
The optimal cadence is different for everyone, but I’d recommend trying to push at least 60RPM in the hills. For reference, I spin at closer to 90RPM a lot of the time. If your low gear isn’t allowing for this kind of cadence, you’ll want to get some smaller gear ratios.

Change Your Gear Ratios
Surprisingly, most touring bikes do not come with adequately low gears for touring in the hills. You may need to change your rear cassette, front chainrings and even your crankset to get a sub-20″ climbing gear. But it will be worth it – hills will soon be your friend, not your foe.

To Better Understand Gear Ratios Go HERE. To Find Out How To Lower Your Current Gearing Go HERE. To Calculate The Steepest Hill You Can Cycle Up Go HERE.

The post You’re Doing It Wrong: Hills Are NOT Harder Than Cycling On The Flat appeared first on CyclingAbout.


The New Sinewave Cycles Beacon Dynamo Light Has A USB Charger With Priority Mode

$
0
0

The team that brought you both the Revolution and Reactor dynamo hub charging systems are just about to release a new dynamo light. Called the Sinewave Cycles Beacon, it’s a bit different to the current crop of dynamo lights.

The defining feature of the Beacon is the way it is powered. The Beacon can be illuminated directly from the dynamo hub, from an external battery pack, or from both simultaneously. With an external battery engaged, you can achieve the full whack of light from standstill. As your speed increases the power source will switch from the battery across to your dynamo hub. And when you slow down, the light will source power from the battery again so that the beam doesn’t dim or flicker.

Not only will the Sinewave Cycles Beacon achieve a consistent beam of light, but it will charge your devices as well. Using the same circuitry as their USB chargers, the light will produce a constant USB charge from the relatively low speed of 12 km/h (7 mph).

Weight: 115 grams with 91cm (36″) dynamo cable
Price: US $325
Origin: Made in the USA

Sinewave Cycles Beacon

The Sinewave Cycles Beacon Light

The Sinewave Cycles Beacon has a maximum output of 750 lumens. That is brighter than Supernova’s E3 Triple (640lm), but not quite as bright as the Exposure Revo (800lm) or K-Lite Bikepacker Pro (1200lm). I’ve found that anything in the 300lm+ range tends to be fine for road use, although the higher outputs are nice for tight, off-road singletrack riding.

As with all dynamo lights, the Beacon gets brighter the faster you go:
200 lumens at 8km/h (5 MPH)
500 lumens at 13km/h (8 MPH)
650 lumens at 16km/h (10 MPH)
750 lumens at 21km/h (13 MPH)

The lens is symmetrical in design, making the light the same brightness across the whole lens and allowing you to mount it in any orientation. The type of lens design is great for off-road use but tends to be rather distracting on the road for anyone approaching from the opposite direction. For this reason, symmetrical lenses are actually illegal to use on the road in some countries, instead favouring a lens design which funnels the light output to the lower portion of the lens.

Inside the lamp is a supercapacitor which holds a small amount of power so that the light can stay on for about five minutes after use. A taillight output wire is pre-installed so you can connect up almost any rear dynamo light.

Sinewave Cycles Beacon

Charging Via USB

The Beacon has a USB port built right into the back of the light. You can plug your phone or GPS directly into here, or you can use a USB extension cable to charge your device elsewhere. When the light is switched ‘off’, you’ll get the maximum amount of power from the dynamo hub for charging. Conversely, when the light is in ‘high’ mode the charger will still draw a current however at a greatly reduced rate.

A middle function called ‘Charger Priority Mode’ allows for both the light and charger to work simultaneously. The light draws enough power to run on a low setting and the remainder is sent to the charger. At slow speeds, this results in the light taking almost all of the power, but the faster you go, the more you can generate for charging. If your device is done charging, all power can go back to the light (the same functionality as the ‘high’ mode).

Sinewave Cycles Beacon

Using the Light Via Battery Power

When the light is drawing power from the dynamo hub, the light output is always maximised. Sinewave Cycles say that “power is optimised at low-to-medium speeds, providing much more light in this range than any other headlight.”

But if you’re powering the light from a battery, you can toggle between the low (100lm), medium (250lm) or high (600lm) settings to suit your conditions or choose how long you want to extend your battery life.

Sinewave Cycles Beacon

Weatherproofing

A concern for many is the idea of having an exposed USB plug which water, mud and grit can potentially damage. While it seems crazy not to provide a cover, this is not dissimilar to other products on the market such as The Plug III or Sinewave’s own Reactor. As bikes are very rarely submerged in water, and the USB port is somewhat protected behind the light, Sinewave Cycles deem a cover unnecessary.

Multiple seals are used to stop water ingress, and the exposed plugs also use non-corroding connectors. Internally everything is made water resistant and the electronics are potted in epoxy. While not impervious to water forever, the weatherproofing should be adequate for the service life of the light.

Sinewave Cycles Beacon

Other Similar Products

AXA Luxx70 Plus – This great value light/charger is only US $100 and although not as bright, still does an adequate job.
Busch und Muller Luxos U – The Luxos U (US $219) has set the standard for headlight charging units for the last five years.

The post The New Sinewave Cycles Beacon Dynamo Light Has A USB Charger With Priority Mode appeared first on CyclingAbout.

How To Choose The Best Dynamo Lights For Bicycle Touring and Bikepacking

$
0
0

Dynamo hubs are becoming more and more common on bikes used for bicycle touring and bikepacking. This can be attributed to advancements in LED technology and the fact that we all have USB powered devices that we like to charge along the way.

This resource will be focusing on the best dynamo lights available. But the best dynamo light for you, may not be the best dynamo light for somebody else. This is because different lights offer different beam shapes, outputs, brightnesses and USB charging capabilities.

Let’s take a look at how to choose the best dynamo lights for your style of riding.

best dynamo lights

Lumens and Lux

The amount of light provided at the light source can be measured in lumens. This is really just a useful unit of measurement when comparing the output of different LED globes. In comparison, the light brightness at a predetermined distance from the light is called lux. German regulation measures the lux on a white wall at a 10-metre distance.

Two lights with the same lumens at the LED globe can therefore have vastly different lux depending on the beam shape. A high lumen light can have a low lux if it has a wide beam, and a low lumen light can have a high lux if it has a narrow beam. The fact that different lights distribute their light in different ways makes it really hard to make brightness comparisons between models.

Best Dynamo Lights

A diagram showing how two lights with different beam shapes result in different lux values. Diagram: DecoHo

Beam Shape of the Best Dynamo Lights

Beam shape, not brightness, is arguably the most important feature of a dynamo light. Lights can have huge lumen outputs, but if they can’t send the light to where you need to actually see, how useful are they? By pairing a suitable reflector with an appropriately bright LED, you can get extremely effective lights for cycling with a fraction of the lumens.

The best way to compare beam shapes is to set up a camera and a light rig. Here are some websites which compare dynamo lights:
BaslerBikesPeterWhiteCycles and Busch & Muller.

best dynamo lights

Comparing the beam shape of the Schmidt Edelux II (L) with the pre-2013 model (R). Diagram: Schmidt Nabendynamo

On-Road vs. Off-Road

Dynamo lights can generally be categorised into on-road and off-road based purely on the way they distribute light.

Off-road lights are almost always symmetrical which means that they can be mounted upside down and will still offer the same light beam. Think of them as a handheld torch. They are symmetrical because it’s useful to see things above your line of sight, such as low-hanging branches.

On-road lights are asymmetrical and therefore focus light towards the shape of the road. The light normally starts 50cm in front of your wheel and gets wider and longer the further it projects. Like a car headlight, the light’s reflector reduces the brightness of the light at eye level for oncoming vehicles and pedestrians. High-quality reflectors can also layer light so that the light that hits closest is not as bright as the light that has to travel furthest.

best dynamo lights

Comparing the beam shapes of symmetric (off-road) and asymmetric (on-road) lens dynamo lights. Diagram: Schmidt

Mounting Your Dynamo Lights Too Low

Dynamo light beam shapes are optimised from the height of your front wheel, the light ideally located near the fork crown. Mounting your light low (off a rack or the fork leg) will make foreground objects brighter and will create shadows from rocks/leaves/potholes. With a bright foreground, it’s also harder to see in the distance because of the way your pupils are contracted under high luminescence.

Of course, it isn’t always useful to mount your dynamo light from your crown. Instead, you can try mounting your light high off a front rack with a tray, from a tri-bar or directly from your handlebar.

Best Dynamo Lights

PeterWhiteCycles capture the shadows and uneven brightness associated with a low-mounted dynamo light.

Dynamo Lights With USB Charging

There’s a handful of lights that incorporate a switch which directs power from the light to charge your USB devices. This creates a nice integrated and cost-effective light/charging system with less cabling. That said, it can be said that chargers built into lights are often less efficient than separate dynamo charging devices because they are not optimised for that purpose.

The Sinewave Cycles Beacon has a ‘Charging Priority Mode’ which allows you to run the light on a low setting, and direct the rest of the power towards charging. As most people charge their devices during the day and run their lights at night, this feature will only be valuable to those who prefer to run day-lights or those who need charging capability at night.

Sinewave Cycles Beacon

The Sinewave Cycles Beacon offers USB charging from the back of the light.

Other Dynamo Light Features

High/Low/Wide Settings
Some lights have variable brightness settings on offer. These light adjustments can be useful to optimise under different light conditions such as urban and country.

Light Sensors
Sensors are installed in some lights to automatically switch between day and night modes. They are designed with a delay between modes in order to prevent car headlights from changing the brightness of your light.

Switchless
Some lights are available in a more compact size without the on/off switch. Seeing as though high-quality dynamo hubs have such a low drag, is it even necessary to switch your lights off these days?

Battery Assist
Some lights (like the Sinewave Cycles Beacon) can employ external battery power to boost the light brightness and reduce flicker at low cycling speeds.

Supernova E3 Pro

Supernova showing their range of colours at Eurobike 2016. Image: Franz Herkendell

The Best Dynamo Lights

Note: If you make a dynamo light purchase through the Amazon links, a small cut goes to supporting CyclingAbout. It’s no cost to you and the money goes a long way to creating more great resources!

Asymmetric Lights:
AXA Luxx70 Plus (70 lux)
– USB charging, amazing value for money (Amazon Special US $153)
B&M IQ-X (100 lux) – Brightest lux available, near-perfect beam shape. (Amazon Special US $129)
B&M Luxos U (70 lux) – USB charging, handlebar mounted switch, great beam shape (US $219)
B&M IQ Premium Fly RT Senso Plus (60 lux) – Best daylight LEDs (14 in total), inbuilt sensor, great beam shape (US $94)
B&M Eyc T Senso Plus (50 lux) – Great value for money, great beam shape, inbuilt light sensor (Amazon Special US $73)
Schmidt Edelux II (95 lux) – Very high lux at low speed, near-perfect beam shape, upside-down lens available (US $176)
Supernova E3 Pro II (205lm) – Extremely well made, 100% waterproof, ultra wide beam. (Amazon Special US $173)

Symmetric Lights:
Exposure Revo (800lm)
– Extremely well made, ultra-bright. (Amazon Special US $241)
kLite Bikepacker Pro (1200lm) – Very compact, ultra-bright, custom light/charge systems, built to order. (US $250)
Sinewave Cycles Beacon (750lm) – USB charging, light assist with battery, very high output at low speed. (US $325)
Supernova E3 Triple II (640lm) – Extremely well made, 100% waterproof, good value light. (Amazon Special US $200)

The post How To Choose The Best Dynamo Lights For Bicycle Touring and Bikepacking appeared first on CyclingAbout.

Gradient Threshold: How To Calculate The Steepest Hill You Can Cycle Up

$
0
0

A few weeks ago I published a piece stating that hills are NOT harder to cycle than the flat. And it’s all true. With the right gears, you can (mostly) overcome the effects of gravity.

I had a few people request how to calculate their ‘gradient threshold’, that is, the gradient at which they can keep up their cadence (pedalling speed) without needing to increase their power (pedalling effort).

This article will help you to calculate the steepest hill you can cycle up without increasing your effort.

Determine Your Total Weight

The first thing you need to do is determine your total weight.

For bicycle touring: that’s your body weight, plus your bike, gear, food and water. Typical touring bikes are in the 12-17kg (26-37lbs) range. Your camping gear, clothes and spares will likely run between 15-20kg (33-44lbs). Gear and food weight generally fluctuates quite a bit depending on the region you’re travelling through, so I’d recommend averaging it all out for most scenarios.

For road/mountain biking: that’s your body weight, plus your bike, clothing, spare parts, food and water. Most road bikes weigh between 7-10kg (15-22lbs), mountain bikes 10-13kg (22-28lbs) and your gear/food/water could be 2-3kg (4-7lbs).

Lake Hume

Example: I’m 78kg. My touring bike is 15kg. For a self-supported tour I generally carry ~15kg of gear. With food and water included that will be about 20kg. So that’s 113kg total.

Find Out Your Lowest Climbing Gear

You can measure the lowest gears on touring bikes using “gear inches”.

Gear inches are calculated using the diameter of your wheel, multiplied by the front sprocket and divided by your rear cog. Sound complicated? Well, head over to this calculator and it will do the maths for you. Pop in your tyre size and crank length. Select gear inches. Then input your smallest front chainring size and largest rear cog. Hit calculate.

gradient threshold

Example: My tyres are 700x38c. My gear ratio is 50x20t on a Rohloff internal geared hub. This yields a 19.1 inch smallest gear. 

Calculate Your Lowest Cycling Speed

Using the same gear calculator, let’s take note of your pedalling speed at 60RPM.

When your pedalling speed (cadence) is low, you fatigue your leg muscles (mostly quads) more and utilise your heart and lungs less. Most cyclists pedal in the 60-100 RPM range. In order to determine your lowest cycling speed, let’s calculate how fast you’ll go in your smallest gear at 60 RPM. If you like to maintain a high pedalling cadence you can select 80 RPM instead.

gradient threshold

Example: With a cadence (pedalling speed) of 60 RPM, I can ride at 5.5km/h in my lowest gear.

Working Out Your Power

You can find out your power in watts using an exercise bike at the gym, or by making an educated guess.

Power is the only metric which you may need to guess. To make the best guess we can look at the power of the average, untrained cyclist; about two watts per kilogram (0.9w/lb) body weight for an hour. So if you’re 60kg, that’s 120w. But if you’re cycling all day that power will drop a little. I’d recommend inputting 1.8 watts per kilogram (0.8w/lb) if you’re untrained.

Example: I’m stronger than most (because I spend so much time cycling!) so the power I can comfortably hold all day is 200w.

Put Your Data Into Bike Calculator

One of my favourite online tools is a website called Bike Calculator. Based on my real-world testing, this online calculator works with great accuracy. You will need to input your power estimate, body weight and bike and gear weight. With this information, the calculator will spit out your cycling speed on the flat.

It’s now time to start adjusting the gradient. The aim of the game is to increase the gradient until your speed matches your slowest cycling speed. When the gradient is increased to the point where you can match your slowest cycling speed, that is your gradient threshold. Any hill steeper than that will require more power or less weight to maintain your cadence.

Example: Inputting my total weight (113kg) and my power (200w), I can adjust the gradient up to 10.7% before my speed slips below 5.5km/h at 60 RPM. If I wanted, I could change my gear ratio to 36x19t which would allow me to climb at 4.1km/h. I could then cycle up a 14.6% gradient with the same power!

Improving Your Gradient Threshold

There are a few things you can do to improve your gradient threshold:

Lowest Climbing Gear
The best place to start is at your lowest climbing gear. By increasing the mechanical advantage of your bike, you can ride up MUCH steeper hills with the same pedalling effort (eg. with 14.4 gear inches I could ride up a 14.5% gradient with the same power). Unfortunately, bikes rarely come with low enough gears to conquer steep climbs… but I can help. You can learn about gear ratios HERE and what parts to change to get additional climbing gears HERE.

Dropping Weight
If you can cut some weight out of your gear (or off your body), it will be of some benefit. But it’s probably not as much as you’d think! By shaving 10kg off my gear, I can go up a gradient that’s 1% extra at the same pedalling effort (ie. 11.7% instead of 10.7%).

Increasing Your Power
This is the hardest way to improve your gradient threshold in a touring context due to the weight of your bike and gear. That said, the more you ride, the fitter you’ll get and the more power you’ll be able to put into your pedals.

The post Gradient Threshold: How To Calculate The Steepest Hill You Can Cycle Up appeared first on CyclingAbout.

What Is The Most Puncture Resistant Touring Tyre? Lab Testing Results

$
0
0

Punctures are the bane of a cyclist’s existence. Often unexpected, punctures seem to always stop you in your tracks in the least convenient of places. We can combat most punctures by using heavy/slow touring tyres. But is there an all-around touring tyre that is light, fast and puncture resistant?

The website Bicycle Rolling Resistance carries out all kinds of lab tests on bike tyres. They focus mostly on rolling resistance but also conduct a tyre tread and sidewall puncture test. We are fortunate enough to have data available of 17 different touring tyre models to examine.

Let’s take a look at the most puncture resistant touring tyres, and weigh them up against the fastest rolling tyres.

puncture resistant

The Test

The Bicycle Rolling Resistance team position a 1 mm thick needle over the centre of the tyre tread and sidewall (not at the same time). They then add weights to the needle until the tyre punctures. To ensure that the results are consistent, they conduct this test five times per tyre tread and sidewall. A score of 10 means it will take twice as much force to puncture a tyre when compared to a score of 5.

Tyre Tread Results:
Vittoria Randonneur – 21
Continental Top Contact Winter II – 17
Continental Top Contact II – 16
Schwalbe Marathon Racer – 16
Continental E.Contact – 16
Schwalbe Marathon Supreme – 15
Schwalbe Marathon – 14
Schwalbe Energizer Plus – 14
Schwalbe Marathon Mondial – 14
Schwalbe Marathon Almotion – 13
Continental Sport Contact II – 13
Continental City Ride II – 13
Schwalbe Marathon Plus – 13
Vredestein Perfect-E – 13
Vittoria Voyager Hyper – 12
Continental Contact II – 11
CST E-Series Reach – 10

The Vittoria Randonneur took twice as much force to puncture than the lowest performing tyre, the CST E-Series Reach. Continental had three of their tyres in the top five, suggesting that their protection belts are very effective.

Tyre Sidewall Results:
Continental E.Contact – 8
Continental Contact II – 7
Vittoria Voyager Hyper – 6
CST E-Series Reach – 6
Continental Top Contact II – 6
Continental City Ride II – 6
Schwalbe Marathon Mondial – 6
Schwalbe Marathon Almotion – 5
Continental Sport Contact II – 5
Schwalbe Marathon – 5
Schwalbe Marathon Plus – 5
Continental Top Contact Winter II – 5
Schwalbe Marathon Supreme – 4
Schwalbe Energizer Plus – 4
Schwalbe Marathon Racer – 4
Vredestein Perfect-E – 4
Vittoria Randonneur – 4

The Continental E.Contact required twice as much force to puncture than the lowest performing tyres. While the Vittoria Randonneur was at the top of the list for tread resistance, it was bumped right down the bottom on this test. Continental again had many tyres perform well in this test.

rolling resistance

Puncture Factor

Bicycle Rolling Resistance use a metric that they call ‘Puncture Factor’. This is the puncture resistance score above, multiplied by the tyre thickness. This probably gives a more accurate depiction of resistance, as thicker tyres tend to prevent more punctures by extending the physical distance debris has to travel to puncture a tyre.

Tyre Tread Puncture Factor Results:
Vittoria Randonneur – 120
Schwalbe Marathon Plus – 117
Continental E.Contact – 106
Schwalbe Marathon – 102
Schwalbe Energizer Plus – 98
Continental Top Contact Winter II – 94
Schwalbe Marathon Almotion – 86
Schwalbe Marathon Mondial – 85
Schwalbe Marathon Supreme – 75
Schwalbe Marathon Racer – 74
Continental City Ride II – 72
Continental Top Contact II – 70
Vredestein Perfect-E – 62
Continental Sport Contact II – 55
Continental Contact II – 46
CST E-Series Reach – 44
Vittoria Voyager Hyper – 40

The Vittoria Randonneur, with its amazing needle score, still came out on top. The Schwalbe Marathon Plus was breathing down its neck thanks to its 9mm thick tread. It’s interesting to note that Schwalbe tyres score better when we factor in tyre thickness (three of their tyres are in the top-five).

Tyre Sidewall Puncture Factor Results:
Continental E.Contact – 15
Continental Contact II – 14
CST E-Series Reach – 11
Continental City Ride II – 11
Schwalbe Marathon – 8
Schwalbe Marathon Plus – 8
Schwalbe Marathon Mondial – 7
Schwalbe Energizer Plus – 6
Continental Top Contact II – 6
Vredestein Perfect-E – 6
Schwalbe Marathon Almotion – 5
Vittoria Voyager Hyper – 5
Continental Sport Contact II – 5
Continental Top Contact Winter II – 4
Vittoria Randonneur – 4
Schwalbe Marathon Supreme – 3
Schwalbe Marathon Racer – 3

The Continental E.Contact again tested best in terms of sidewall protection. This can be attributed to the fact they’re designed for high-speed electric bikes which require a stiff sidewall casing for imperfections in the road. The Continental Contact II and City Ride II again scored particularly well for the sidewall test.

rolling resistance

Puncture Resistance vs. Rolling Resistance

While the Vittoria Randonneur and Continental E.Contact tyres took out all of the puncture resistance tests, they have also shown to be the slowest touring tyres available out of the 17 tested.

In my article about tyre rolling resistance, I show you how using high rolling resistance tyres actually slows your speed more than carrying 30 extra kilograms!

So that got me thinking. I wanted to see what would happen if I gave equal weighting to both the puncture resistance and rolling resistance tests, so I created a ranking system for all four puncture resistance scores. Once I’d ranked the 17 tyres from 1-12 (due to a handful of equal scores), I combined the puncture resistance ranking with the rolling resistance rankings.

Combined Puncture Resistance and Rolling Resistance Test Results:
=1. Schwalbe Marathon – 4th Puncture / 5th Rolling
=1. Schwalbe Marathon Almotion – 8th Puncture / 1st Rolling
=2. Schwalbe Energizer Plus – 6th Puncture / 6th Rolling
=2. Schwalbe Marathon Supreme – 9th Puncture / 3rd Rolling
03. Vittoria Voyager Hyper – 12th Puncture / 2nd Rolling
=4. Schwalbe Marathon Plus – 3rd Puncture / 12th Rolling
=4. Continental Sport Contact II – 11th Puncture / 4th Rolling
05. Continental Top Contact II – 8th Puncture / 8th Rolling
=6. Continental E.Contact – 1st Puncture / 17th Rolling
=6. Vittoria Randonneur – 2nd Puncture / 16th Rolling
=6. Continental City Ride II – 7th Puncture / 11th Rolling
=6. CST E-Series Reach – 11th Puncture / 7th Rolling
=7. Schwalbe Marathon Mondial – 6th Puncture / 13th Rolling
=7. Schwalbe Marathon Racer – 9th Puncture / 10th Rolling
=8. Continental Top Contact Winter II – 5th Puncture / 15th Rolling
=8. Continental Contact II – 11th Puncture / 9th Rolling
09. Vredestein Perfect-E – 10th Puncture / 14th Rolling

The Schwalbe Marathon and Marathon Almotion are the combined rolling/resistance test winners. Picking between them is a matter of prioritising speed or puncture resistance. If you’re after something a bit lighter in weight, the Schwalbe Marathon Supreme is ~30% lighter than the Marathon Almotion as well as being almost as puncture resistant and fast.

Lake Hume

Choosing Your Puncture Resistant Touring Tyres

If you never want to think about punctures again, I’d suggest using:
Vittoria Randonneur ($30)
Schwalbe Marathon Plus
– Continental E.Contact

BUT… if you’re keen to reduce your rolling resistance but don’t want to compromise too much on protection – it’s hard to look past the Schwalbe Marathon ($33). These are the most common touring tyres for a reason.

If rolling resistance is your priority (the best touring tyres can save you 1-2km/h) then you’ll want to get your hands on some Schwalbe Almotion tyres ($54). I’ve been using a set for over 2000km now and haven’t yet had a puncture. Plus they feel really fast under my loaded touring bike.

Wanna help support CyclingAbout? Grab some tyres from Amazon by using the links above & CyclingAbout gets a tiny bit from each sale. No cost to you, easy as pie!

Have You Read About Touring Tyre Rolling Resistance Yet?

The post What Is The Most Puncture Resistant Touring Tyre? Lab Testing Results appeared first on CyclingAbout.

The Ortlieb Bikepacking Bag Range Expands For 2018 To Include More Sizes

$
0
0

This time last year, Ortlieb joined the bikepacking bag ranks with the announcement of some high-quality waterproof goods. The Ortlieb bikepacking range was really well received, but like all things, it had room for improvement.

One of the biggest criticisms of the Ortlieb Handlebar Pack and Ortlieb Seat Pack was simply the sizing. The Handlebar Pack had a roll diameter and length which was much better suited to a flat handlebar bike, and the Seat Pack was like a wet noodle if you didn’t fill it up enough.

The 2018 Ortlieb bikepacking range takes care of the sizing issues with two smaller models, along with three entirely new products.

Ortlieb Seat Pack M

The original Ortlieb Seat Pack L is a true giant. At 16.5L and with the requirement of a 2/3 fill in order to properly cinch the straps, it certainly has its limitations. The new 11-litre Ortlieb Seat Pack M is a welcome addition also suitable for day rides. It keeps all the same great infrastructure of its bigger sibling like the purge valve and plastic reinforced skeleton, but the single strap design reduces the seatpost space required to just 6cm (2.4″). The reduced diameter is good for some extra tyre clearance for your small-sized or dual suspension bike, and is available in a package that shaves 29% off the weight of the Seat Pack L (now 326g / 11.5oz).

ortlieb bikepacking

Ortlieb Handlebar Pack S

Like the Seat Pack, the Handlebar Pack now comes in a new smaller size for road handlebars – think of the size S as the drop bar model, and the size M as the flat handlebar model. The overall length is down to a more appropriate 45cm (17.7″) as opposed to 58cm (22.8″) for the existing model. The Handlebar Pack S also gains 4cm (1.5″) clearance to the front tyre due to the slightly smaller roll diameter of 16cm (6.3″). With these reduced dimensions, you can expect this 9L bag to come in at 375g (13.2oz).

ortlieb bikepacking

Ortlieb Gravel Pack Panniers

Ortlieb panniers are not dead. Stripped of a shoulder strap and put on diet, these front panniers are the lightest Ortlieb have ever made (I think). Thanks to the ultra light PS21R waterproof fabric used across the entire Ortlieb bikepacking bag range, they actually work out to be 20% lighter than the equivalent Front Roller Plus model. To make them better suited for offroad use, they’re shipped with an extra rotatable lower hook (which I prefer to use with all Ortlieb panniers anyway).

ortlieb bikepacking

Ortlieb Bikepacking Frame Pack

A new 4L half frame bag has been added to the 4L and 6L frame bags already available. At just 170g (6oz) this is a welcome addition for those like me who prefer to use two bidons for water. The 50cm (20″) total length should allow you to fit most tent poles inside this bag, along with other quick-access goods like multi-tools, tubes or snacks.

ortlieb bikepacking

Ortlieb Cockpit Pack

At just 82g (2.9oz), the Ortlieb Cockpit Pack has been added to the range for your phone, camera or snacks. The bag features an internal stiffener so you can access the bag with one hand while riding. Like all Ortlieb bikepacking gear, this 0.8L bag is fully waterproof as it utilises a clever internal zip flap and water drainage system (notice the holes below the zip?) to keep your electronics happy.

ortlieb bikepacking

Head HERE For My Ortlieb Handlebar M Pack Review and HERE For My Ortlieb Seat Pack L Review

The post The Ortlieb Bikepacking Bag Range Expands For 2018 To Include More Sizes appeared first on CyclingAbout.

How Much Does Dynamo Hub Drag Really Slow You Down? Lab Testing Results

$
0
0

Dynamo hubs are quite widely adopted in the bicycle touring, bikepacking and ultra racing scenes. With LED light technology allowing for 1300 lumen (or 100+ lux) light outputs, USB charging for gadgets and lithium ion battery storage – dynamo hubs feel like the right way to harvest energy.

But where does this energy come from, and to what extent does it slow us down?

If you’ve ever picked up a dynamo hub and tried to spin the axle, you’ll know that they feel incredibly ‘notchy’. This is the result of a series of powerful magnets passing a coil and in turn, creating an electric charge.

The writers at FahrradZukunft put together some lab tests a few years ago to find out more about dynamo hub drag. Let’s take a look at their testing, the data and then draw some conclusions about the effect of dynamo hub drag on our speed.

dynamo hub drag

A look inside a Schmidt SON dynamo hub. Image: FahrradZukunft

The Lab Test

The different dynamo hubs were clamped into a lathe and spun to different speeds. The speed was determined simply by measuring the frequency of the generator with the known number of pole pairs. A supporting load was applied to the opposite end of the hub to replicate the downward force of a fork, and a 12-ohm electrical load resistor is connected to replicate a standard dynamo lighting system. With everything setup, the drive power is then calculated.

dynamo hub drag

The testing setup. Image: FahrradZukunft

The Results

Light Switched OFF While Cycling @ 10-30km/h
Schmidt SON28 // 0.25w-1.25w drag
Schmidt SONdelux // 0.25w-1.25w drag
SP Dynamo PV8 // 0.50w-1.75w drag
Shimano DH-3N80 // 0.50w-2.50w drag
Sanyo H27 // 1.00w-6.00w drag

The lowest drag hubs with the light switched OFF are the SON hubs. They’re rolling almost as efficiently as a regular hub despite having the dynamo infrastructure. The SP Dynamo hub is the next most efficient, followed by the Shimano DH-3N80 hub. The Sanyo H27 is clearly the least efficient dynamo hub on test and was almost 5x less efficient than a Schmidt hub at 30km/h!

dynamo hub drag

Light Switched ON While Cycling @ 10-30km/h
Schmidt SONdelux // 2.50w-6.50w drag
SP Dynamo PV8 // 2.75w-7.00w drag
Schmidt SON28 // 3.00w-6.50w drag
Sanyo H27 // 3.75w-7.25w drag
Shimano DH-3N80 // 3.50w-7.50w drag

The lowest drag hub is the SONdelux. Next is the SP Dynamo which achieves a marginally lower drag than the SON28 at 10km/h, but is 0.5w higher at 30km/h. The Shimano DH-3N80 performs well at slower speeds, but is the least efficient hub option at 30km/h. The Sanyo H27 is surprisingly efficient when switched on, in fact, it’s MORE efficient than the more expensive options at high speeds!

dynamo hub drag

Other Comparable Data

Schmidt have conducted their own testing for the SONdelux, SON28 and Shimano DH-3N80 hubs. The results fall very closely in line with the independent testing conducted by FahrradZukunft, but their data shows slightly less drag on all three hubs between 10-30km/h. This could be due to a different electrical load applied to the hubs.

Light Switched OFF While Cycling 10-30km/h
Schmidt SONdelux // 0.25w-1.00w drag
Schmidt SON28 // 0.25w-1.50w drag
Shimano DH-3N80 // 0.50w-2.00w drag

Light Switched ON While Cycling 10-30km/h
Schmidt SONdelux // 1.80w-6.10w drag
Schmidt SON28 // 2.15w-6.50w drag
Shimano DH-3N80 // 2.30w-7.25w drag

dynamo hub drag

The Effect On Your Speed

We now have an idea of the numbers, but how does this translate in terms of speed?

Let’s compare two different rider weights (60 and 80kg) and gear weights (15kg and 30kg). I’ll adjust the power (effort) to be more in line with each of those rider weights too (100w and 150w). We can assume the drag of a non-dynamo hub is 0.5 watts. I’ve taken the dynamo hub drag at the different speeds and subtracted 0.5 watts in order draw a direct comparison.

The calculations have all been done with BikeCalculator.com which I’ve found to be very accurate from prior testing.

60kg rider / 15kg Bike and Gear / 100 watts / Non-Dynamo Hub = 24.34km/h.
Most efficient hub: off – 24.29km/h (0.5w extra drag) +0.02%
Least efficient hub: off – 23.94km/h (4.0w extra drag) +1.6%
Most efficient hub: on – 23.82km/h (5.25w extra drag) +2.1%
Least efficient hub: on – 23.71km/h (6.25w extra drag) +2.6%

60kg rider / 30kg bike and gear / 100 watts. Non-Dynamo Hub = 23.83km/h.
Most efficient hub: off – 23.78km/h (0.5w extra drag) +0.02%
Least efficient hub: off – 23.42km/h (4.0w extra drag) +1.7%
Most efficient hub: on – 23.29km/h (5.25w extra drag) +2.3%
Least efficient hub: on – 23.19km/h (6.25w extra drag) +2.7%

80kg rider / 15kg bike and gear / 150 watts. Non-Dynamo Hub = 27.96km/h.
Most efficient hub: off – 27.92km/h (0.6w extra drag) +0.01%
Least efficient hub: off – 27.60km/h (4.75w extra drag) +1.3%
Most efficient hub: on – 27.53km/h (5.75w extra drag) +1.5%
Least efficient hub: on – 27.46km/h (6.60w extra drag) +1.8%

80kg rider / 30kg bike and gear / 150 watts. Non-Dynamo Hub = 27.51km/h
Most efficient hub: off – 27.47km/h (0.6w extra drag) +0.02%
Least efficient hub: off – 27.15km/h (4.75w extra drag) +1.3%
Most efficient hub: on – 27.07km/h (5.75w extra drag) +1.6%
Least efficient hub: on – 27.01km/h (6.60w extra drag) +1.8%

The Effect On Your Riding Time

Using the speed data, we can work out how drag translates in terms of time:
– The most efficient dynamo hubs when switched OFF add between 17 and 30 seconds to a flat ride over 100km when compared to a regular hub.
– The most efficient dynamo hubs when switched ON add between 3min 24sec and 5min 47sec to a flat ride over 100km when compared to a regular hub.

Does Dynamo Hub Drag Really Matter?

Only a little.

To put dynamo hub drag into perspective we can compare the 1.5-2.7% slower speeds with a:
– 7.9% slower cycling speed when using four panniers as opposed to bikepacking bags
– 5.4% slower cycling speed when using Schwalbe Marathon Mondial tyres as opposed to Schwalbe Almotion
– 3.2% slower cycling speed when carrying 30kg extra luggage on a flat road

Given the leverage of a wheel and the flywheel effect of the rotating mass, dynamo hub drag only has a small effect on your speed. The result for most people is likely to be an extra three to six minutes riding time over 100km, all while getting a good charge to your electronics (or while running lights).

The post How Much Does Dynamo Hub Drag Really Slow You Down? Lab Testing Results appeared first on CyclingAbout.

Velo Orange Crazy Bar Review: Better Than Road Handlebars?!

$
0
0

I’ve been a consistent advocate of road handlebars for bicycle travel for some time. I really like the near/far/high/low hand locations, as well as the slightly different wrist angles. But a handlebar called the Velo Orange Casey’s Crazy Bar recently piqued my interest – so I bought a set.

custom touring bike

What The?!

This weird-looking ‘alt’ handlebar is a unique combination of a bullhorn and swept-back flatbar. The 400mm wide bullhorn section offers a stretched-out, aerodynamic position similar to the brake ‘hoods’ on a drop handlebar. The centre portion replicates the ‘tops’ of a drop handlebar. And this is all mated to a 45-degree sweptback section that is both ergonomic and wide for additional steering stability.

The Crazy Bar is constructed using heat-treated aluminium which is fine for touring, but not intended for mountain bike use. That said, Velo Orange produce a steel version that is MTB-rated.

Weight is very reasonable at 450 grams. That makes these bars lighter than many alt handlebars including the Jones Loop in both titanium and aluminium. The Crazy Bars come in both black or silver and can be purchased for just US $60.

Head HERE to see all the different kinds of alt handlebar available.

custom touring bike

The Perfect Replacement for Drop Handlebars?

The Crazy Bar is a little different to other ‘alt’ handlebars: it’s optimised for bikes that come with road handlebars.

Huh? 

Ok, let me explain. Frames designed around road handlebars are ideally shorter than those with flat handlebars. This is because the distance you have to reach to access the brakes is about 50mm further on a road handlebar. Therefore, to get the same overall ‘reach’ we need shorter frames to compensate for this handlebar discrepancy. In fact, Salsa offers their Marrakesh touring frames in both a flatbar and dropbar design to make sure you achieve a comparable overall reach with your desired handlebar.

Given that the bullhorn section of the Crazy Bar matches the brake hood position of a road handlebar, these bars tend to be best fitted to a bike that currently uses road handlebars. If you’re thinking of fitting these to a bike that comes with flat handlebars, you’ll need to lop more than 40mm off the length of your stem to compensate.

custom touring bike

The Crazy Bar Geometry

The total width of the Velo Orange Crazy Bar is 666mm. I’ve found this width to offer as much handlebar leverage as I need to tackle even the roughest dirt trails. The distance between the bullhorns is 400mm which feels really natural for me as a rather oversized human. They’re probably going to be on the wide side if you’re a small female, however.

The sweptback section is the same 22.2mm bar diameter as a regular flat handlebar, fitting MTB shifters, Rohloff shifters and all the standard hydro or cable brake levers. The 22.2mm bar diameter extends to the ‘tops’ where it permits you to fit Paul ‘Thumbie’ shifters that use a hinge-clamp design. The bar diameter of the bullhorn section matches that of the ‘drops’ of a road handlebar. You can fit barend shifters to the end of the bullhorns, or perhaps even inverse brake levers (like those on a time trial bike).

The handlebar clamp diameter is 25.4mm. This is the old MTB size while current stems are 31.8mm. Not a huge deal, but it did mean that I couldn’t use any of my spare 31.8mm stems.

crazy bar

Fit and Ergonomics

When I installed the Crazy Bars I found the stem position to be rather different from how I like my road handlebars.

My final position is about 50mm lower and I’ve switched the stem to a model that’s 20mm shorter. This is because I’ve opted for a bar height somewhere between the height of my ‘hoods’ and ‘drops’ of my road handlebar setup. As this lower height increases the reach to the handlebars, I’ve reduced the length of my stem.

I originally had the Crazy Bars setup to be completely horizontal. This worked out well when using the bullhorns, but the 45-degree section put too much stress on my wrists after a few hours. I rotated the handlebars back and they’re now sitting at 17-degrees from parallel. I don’t like the bullhorn position as much in this location, but my wrists don’t complain in the sweptback position.

crazy bar

Other Good Things

Off-Road Descending
Compared to my road handlebars, the Crazy Bars offer so much more control. I’ve found I can really load up my front panniers, and be able to steer them with precision on some really rough sections of road. This can be attributed entirely to the additional width on offer.

MTB Shifters
I have a whole series of articles on this website dedicated to mating MTB derailleurs with road bike shifters to achieve lower gear ratios. I have a page which shows you all the ways to mount a Rohloff shifter on a road handlebar. I talk about the benefits of barend/friction shifters in multiple sections too. But all of these are irrelevant workarounds when it comes to the Crazy Bar – just fit your MTB derailleurs with your MTB shifters and enjoy.

Brake Cables
Brake cable changes are a real pain on road handlebars because the brake cables run underneath your bartape. With regular v-brake levers, you can open up the brake cables for a quick lube in a matter of seconds. My brakes have never felt snappier!

Lake Hume

Final Thoughts

A few trips ago I couldn’t imagine riding a bike without road handlebars. But after 4000km+ on the Crazy Bars, I have zero intention of switching back. I’ve still got my aerodynamic ‘road’ position in the form of the bullhorns. The only thing I really miss about my old drop bars is the bike aesthetic, but I’m almost over that now.

The Crazy Bars have got to be the most versatile bar option. The extra width makes descending on rough roads easy, even with heavy front panniers. The narrow bullhorn section allows you to cut through the wind. The 22.2mm bar diameter takes away the need to do any workarounds when matching MTB derailleurs with road shifters.

Here’s to the next 12-months with the Crazy Bars.

The post Velo Orange Crazy Bar Review: Better Than Road Handlebars?! appeared first on CyclingAbout.


How Cool Is The World’s First Bicycle Touring Board Game!?

$
0
0

It has never crossed my mind that bicycle touring could be incorporated into the theme of a board game, but it makes sense – there is strategy to bicycle touring, just as there is strategy to games. Think about it, we are constantly calculating distances, time and thinking about all of the potential ‘road blocks’ that can affect our journeys.

I recently got an email from The Open Road telling me they’re putting the final touches on the world’s first bicycle touring board game. I’m all about incorporating bicycle touring into my every thought, so I thought it’d be cool to share. 😉

bicycle touring board game

How Did The Bicycle Touring Board Game Come About?

Blair and Carl wanted to create a game that represented their love and passion for the outdoors. They thought about a variety of outdoors ideas and concepts for the game and eventually arrived at the decision to run with bicycle touring.

The map is largely based on the United States Bicycle Route System and features many of the landmarks that the USA is famous for. I’m fairly certain that playing this bicycle touring board game would be a great way to familiarise yourself with the geography of the USA!

bicycle touring board game

As the gameplay was finalised, they started producing prototypes that looked as much like the final version as possible. Blair and Carl took The Open Road to game-specific stores, as well as different restaurants and bars to test it with everyone.

They engaged Dutch artist Saskia Rasink to do all the illustration work. I think you’ll agree that her original designs look rather beautiful!

bicycle touring board game

Basic Gameplay

The object of the game is to journey from one coast to the other. It starts with each person selecting one east coast, west coast and heartland card. This determines the route you’ll be taking. Each person has a ‘pannier’ that they load with energy, money and playing cards.

bicycle touring board game

bicycle touring board game

bicycle touring board game

Energy cubes propel you forward, money cubes afford you luxuries and the playing cards offer strategic advantages. Like a bicycle tour, the tactical rationing of these resources will be necessary for completing your adventure. Accumulating playing cards and the more decisive Mother Lode Cards can give you an edge against other players. Headwinds, broken spokes, snapped pedals, thieves and more may disrupt your journey and force you to rethink your strategy.

bicycle touring board game

How To Get The Game

The Open Road is currently on Kickstarter and it’s only $40. If you back this game and it meets the $25,000 goal, the game will be delivered by the end of the year. Maybe this game is the perfect prep for completing my year-long, 12,679mi USA bike tour with 70-degree weather every day!?

The post How Cool Is The World’s First Bicycle Touring Board Game!? appeared first on CyclingAbout.

Low Climbing Gears On Your Road Bike: Six Road Crankset Options

$
0
0

When it comes to mountain roads, most road bikes don’t have low enough climbing gears. I see people struggling all the time, grinding away, trying to get over the top of their lowest gears so that their pedalling rate doesn’t drop to catastrophically low turning speeds.

A few months ago I published a piece stating that hills are not harder than cycling on the flat. And it’s true. When you ride up a hill and you’re pushing 150 watts, that is the same 150 watts as when you’re cycling on the flat. The difference is that 150 watts on a climb simply translates into a slower speed due to the effects of gravity. By using a mechanical advantage (low enough gears), you can pedal at the same revolutions per minute AND push the same amount of power into the pedals on most road gradients – check out my piece on how to calculate the steepest hill you can cycle up.

The crankset is a good place to achieve climbing gears. This is because it allows you to use cassettes with less of a jump between the cogs, and because you won’t need to hack and modify too many drivetrain parts. Basically, there’s no funny business here.

With all of these cranksets:
– You can use your existing road derailleurs without exceeding capacity (long cage highly preferable)
– You won’t need to fit a mountain bike cassette
– You won’t have to modify the position of your rear derailleur (No RoadLink or long B-Screws)

Let’s take a closer look at the cranksets that offer better road bike climbing gears.

Praxis Sub-Compact Cranksets (48-32t)

Praxis Works has managed to fit sub-compact chainrings (32t instead of 34t) on their current cranksets, despite using the same chainring dimensions as a ‘compact’ crankset (110BCD). These cranks are available in the 30mm axle diameter (BSA, BB86, 386EVO, BB30/PF30) and go for between US $175 and $240.

With my weight, power and preferred cadence, I can technically ride a 6.9% gradient all day long with these ratios (0.5% steeper than a compact crankset).

Crankset: 48-32t
Cassette: 11-32t
Setup Capacity: 37t
Smallest Gear w/ 700×28 Tyres: 27 Gear Inches
Maximum Gradient (90kg/200w/80rpm): 6.9%

FSA Adventure Sub-Compact Cranksets (46-30t)

46-30t or 48-32t.

FSA last year released their adventure ‘sub-compact’ crankset range which is quite popular on stock bikes of all price points. The US $90 FSA Tempo (9-speed, square taper) is the cheapest option, and the range tops out at US $350 for the 617g FSA SL-K carbon crankset (10/11-speed, BB386).

With my weight, power and preferred cadence, I can technically ride a 7.4% gradient all day long with these ratios (1.0% steeper than a compact crankset).

Crankset: 46-30t
Cassette: 11-32t
Setup Capacity: 37t
Smallest Gear w/ 700×28 Tyres: 25 Gear Inches
Maximum Gradient (90kg/200w/80rpm): 7.4%

Middleburn RS8 X-Type Super Compact Cranksets (46-30t)

Image: Enigma Bikes

Middleburn makes a 94BCD road “super compact” spider for their RS8 crankset which allows you to run a 46t outer ring and 30t inner ring. This 24mm axle crankset will directly be able to replace any bike currently using a Shimano crankset. You can also use them with adapter cups for BB30 bearings, and they will fit threaded bottom brackets with external bearing cups.

With my weight, power and preferred cadence, I can technically ride a 7.4% gradient all day long with these ratios (1.0% steeper than a compact crankset).

Crankset: 46-30t
Cassette: 11-32t
Setup Capacity: 37t
Smallest Gear w/ 700×28 Tyres: 25 Gear Inches
Maximum Gradient (90kg/200w/80rpm): 7.4%

Sugino Compact Plus Cranksets (42-26t)

Sugino OX601D Compact Plus Crankset – EpicureanCyclist.com

Sugino makes what they call “compact plus” cranksets with 110/73BCD chainring sizes. This setup provides a super small inner climbing gear and a nice low q-factor (145mm width between the pedals). This 24mm axle crankset will directly be able to replace any bike currently using a Shimano crankset (including BB90 press fit). You can also use them with adapter cups for BB30 bearings, and they will fit threaded bottom brackets with external bearing cups.

With my weight, power and preferred cadence, I can technically ride a 8.7% gradient all day long with these ratios (2.3% steeper than a compact crankset).

Crankset: 42-26, 44-28, 46-30t
Cassette: 11-32t
Setup Capacity: 37t
Smallest Gear w/ 700×28 Tyres: 22 Gear Inches
Maximum Gradient (90kg/200w/80rpm): 8.7%

Note: a braze-on front derailleur mount may not get the derailleur low enough. Band clamps are ideal. 

White Industries VBC Cranksets (40-24t)

White Industries VBC Cranks can use a 24t inner chainring – OceanAirCycles.com

The White Industries VBC cranks have a narrow 150mm q-factor and can operate with a 24 tooth difference between chainrings; although I’d recommend a 16-20 tooth difference so that you don’t exceed the capacity of your road rear derailleur. Inner rings start at 24t and go up in even increments. There is both a BB30/PF30 model and a square taper model for those with threaded bottom brackets.

With my weight, power and preferred cadence, I can technically ride a 9.5% gradient all day long with these ratios (3.1% steeper than a compact crankset).

Crankset: 40-24, 42-26t
Cassette: 11-32t
Setup Capacity: 37t
Smallest Gear w/ 700×28 Tyres: 20 Gear Inches
Maximum Gradient (90kg/200w/80rpm): 9.5%

Note: a braze-on front derailleur mount may not get the derailleur low enough. Band clamps are ideal. 

Middleburn RO1 Incy Cranksets (36-20t)

Middleburn Incy 94/58 BCD Crankset

The award for the smallest chainring on a road crankset goes to Middleburn with their 94/58 BCD “Incy” chainring spider (removable). The “Incy” spider offers a small front chainring as low as 20 teeth! That gets your low gear right down to 17 gear inches. The RO1 cranks are for threaded BB bikes only – sorry pressfit crew.

With my weight, power and preferred cadence, I can technically ride a 11.5% gradient all day long with these ratios (5.1% steeper than a compact crankset).

Crankset: 36-20t, 38-22t, 40-24t, 42-26t, 44-28t
Cassette: 11-32t
Setup Capacity: 37t
Smallest Gear w/ 700×28 Tyres: 17 Gear Inches
Maximum Gradient (90kg/200w/80rpm): 11.5%

Note: a braze-on front derailleur mount may not get the derailleur low enough. Band clamps are ideal. 

For More Drivetrain Options With Climbing Gears Head HERE

The post Low Climbing Gears On Your Road Bike: Six Road Crankset Options appeared first on CyclingAbout.

12kg Gear List: The Japan Long Haul Trailer Tour

$
0
0

This is my gear list for a five-week tour of Japan.

– I will be travelling with a friend, so much of the cooking gear, sleeping gear, tools and spares will be shared between us.
– We intend to camp most nights, so we’ve packed to be self-sufficient for days on end.
– We expect the temperature range to fluctuate between 10-30 degrees Celsius (50-86f).

You can check out my titanium road bike and trailer setup HERE.

You Can Follow The Japan Long Haul on Facebook or Instagram.

japan long haul

Clothing: 3720g
Casual Shirt x2 – 400g
Thermal Layer – 200g
Undershirt – 70g
Quick-dry Shorts – 130g
Cycling Shorts – 200g
Leg Warmers – 150g
Waterproof Socks – 130g
Gloves – 85g
Underpants x2 – 80g
Socks x1 – 25g
Sandals – 587g
SPD Sandals – 1000g
Rain Jacket – 533g
Rain Poncho – 130g

Toiletries: 517g
Toothbrush – 20g
Toothpaste – 40g
Deodorant – 50g
Towel – 100g
Exfoliating Glove – 13g
Shaver – 37g
Sun Cream – 50g
Nail Clippers – 37g
Electric Trimmer – 170g

Camera and Electronic Gear: 826g
Panasonic V700 Camcorder – 200g
Rode Lavalier Microphone – 20g
64gb of SD Cards – 5g
Camera Charger and Batteries – 100g
Gorillapod Phone Tripod – 30g
Phone + Charger – 150g
8000mAh Power Pack – 200g
Headphones – 30g
Power Adapter – 91g

Sleeping Gear: 3515g
Mont Moondance 2 Tent – 1900g
Macpac Sleeping Bag – 800g
Thermarest Neoair Mat – 500g
Exped Pillow – 215g
Head Torch – 100g

Cooking Gear: 1616g
Canister Stove – 90g
MSR Quick 2.5L Pot – 266g
MSR Quick 1.3L Pot – 211g
MSR Quick Dry Plates x2 – 128g
MSR Insulated Cups x2 – 160g
Bialetti Stove Top Coffee Maker – 250g
Kitchen Bag – 79g
Detergent Bottle – 20g
Cutlery Bag, Forks, Spoons, Knives – 166g
Chopping Board – 71g
Cigarette Lighter – 20g
Pocket Knife – 137g
Steel Wool – 18g

Tools, Spares, Essentials: 2665g
Wallet – 50g
Sunglasses – 30g
Pump – 100g
Multitool – 130g
13mm Spanner for Trailer – 100g
Elastic Washing Lines – 45g
Spare Tubes x3 – 300g
Patch Kit – 30g
Bike Lock and Case – 1220g
Helmet – 250g
Lights – 200g
Chain Lube and Old Sock – 50g
Bidons x2 – 100g
Passport – 60g

Gear Total: 12.5kg (27.5lbs)

Bike: 10kg
Trailer: 7kg

The post 12kg Gear List: The Japan Long Haul Trailer Tour appeared first on CyclingAbout.

Is This Saddlebag Sway Stabilizer The Perfect Solution For Bikepacking Bags?

$
0
0

When it comes to bikepacking bags, many of you will probably agree that ‘saddlebag sway’ is one of the more irritating traits.

We’ve seen all kinds of solutions, such as bags supplied with mini racks (Porcelain Rocket, Arkel, Specialized), internal metal reinforcement (Ortlieb), rail ‘wings’ (Bedrock Designs) and specially-designed drybag and rack setups (PDW).

While these stabilized bags undoubtedly work at reducing tail wag, perhaps there is a simple solution for all other models?

The Woho Saddlebag Sway Stabilizer

Woho has come up with a rather simple aluminium stabilizing bracket, which I think you’ll agree is pretty damn neat. Mounting on the saddle rails it cradles either side of your saddlebag and keeps it in check. It’s barely noticeable when you have a saddlebag in place!

saddlebag sway

Not only does the stabilizing bracket work its magic with the bag, it provides 2x triathlon-style bottle cage mounts. There’s a chance you’ll have lost some of your bottle space inside your frame to a full frame bag, so this could be the perfect storage location for water. Or maybe you were looking for extra water storage anyway? Simply bolt your favourite cages on and off you go.

And if you don’t need the additional cages, don’t use ’em. Simple.

The mount measures 15cm L x 12cm W x 10cm H (5.9″ x 4.7″ x 4.0″) so it may not necessarily fit all saddlebags depending on the bag width just behind the saddle. I’d suggest it should fit most, however. The Woho Stabilizer adds only 77g (0.17lb) to your bike’s weight, bringing your non-stabilized bag setup in line with most of the already stabilized options anyway.

You can get these anti sway bars from the Woho Online Store for US $20. Shipping will possibly match the value of the product depending on the region, so I’d recommend finding a friend to go in with you.

Here’s 10 Awesome New Tech Innovations For Bikepacking Bags

The post Is This Saddlebag Sway Stabilizer The Perfect Solution For Bikepacking Bags? appeared first on CyclingAbout.

What’s The Difference In Speed Between Gearbox Systems? Rohloff, Pinion, Shimano

$
0
0

Gearbox systems are becoming more and more popular on touring bikes. The most common form of gearbox is the internally geared rear hub, which has actually been available since the late-1800s. The earlier ones were a two-speed design, but these days we have the 14-speed Rohloff hub as our benchmark.

More recently you will find internal gearbox cranksets on touring bikes. The Pinion 18-speed gearbox is growing in popularity and is now found on touring bikes from more than 30 manufacturers.

While there is often a weight penalty to gearbox systems over derailleurs, this is negated by how easy they are to maintain, especially in poor cycling conditions. But let’s put the pros and cons of gearboxes aside for a second.

What I want to know is the difference in drivetrain efficiency between gearbox systems. With this data, I can then analyse the speed differences between different gearboxes.

gearbox systems

The internal geared hub test rig used by Andrea Oehler from FahrradZukunft.

The Test

Andreas Oehler from online magazine FahrradZukunft conducted his own testing to find out the drivetrain efficiency between gearboxes, using a singlespeed drivetrain as a benchmark. You can read the full internal hub test HERE and the internal crank test HERE.

Two different test rigs were setup to measure both internally geared hubs and internal crank gearboxes. The pedalling rate was setup at 60 RPM which provided the most consistent data (despite most cyclists pedalling 20%+ faster). A low-tension lubed chain was used to drive the wheel and the same front chainring was used for each test.

Two different power rates were tested, 50 watts and 200 watts; the former used to get a sense for the idle losses at the gearbox.

gearbox systems

The Pinion P1.18 test rig used by Andreas Oehler from FahrradZukunft.

The Results

While the data from the graph indicates the drivetrain efficiency for each gear, I’ve averaged out the drivetrain efficiency across each gear range to come up with the following numbers:

Singlespeed: 97% efficient (Drivetrain loss of 6w @ 200w).
Rohloff : 94.5% efficient on average across 14 gears (Drivetrain loss of 11w @ 200w)
Pinion: 90.5% efficient on average across 18 gears (Drivetrain loss of 19w @ 200w).
Shimano Alfine 11: 90.5% efficient on average across 11 gears (Drivetrain loss of 19w @ 200w).
Shimano Nexus 8: 90% efficient on average across 8 gears (Drivetrain loss of 20w @ 200w).
Nuvinci 360: 83.5% efficient on average across the gear range (Drivetrain loss of 33w @ 200w).

You can see the Nuvinci 360 testing on this graph

testing gearbox systems

X-Axis: the gearbox gear. Y-Axis: the drivetrain efficiency rate.

Analysis

For this article, I will focus on the power rate of 200 watts as it’s in line with my other testing. 

At a power rate of 200 watts, there was less than 10 watts difference between the most common gearbox systems (Rohloff, Pinion and Shimano). While seemingly insignificant, this is a similar difference in resistance between a set of touring tyres with an off-road tread (Schwalbe Marathon Mondial) and a set of road touring slicks (Schwalbe Marathon).

The Rohloff hub came out on top, as it’s more efficient in almost every gear than the other gearboxes. Two things are surprising, however; in the direct drive gear (number 11) it’s less efficient than gear 8 despite it engaging more moving parts, and the noisiest gear (number 7) isn’t actually the least efficient. I’m not exactly sure why these may be.

The Pinion P1.18 is the most consistent throughout its gear range. It slightly underperforms when compared the Alfine 11 in the low gears, but has the edge in the higher gears. These two gearboxes average out to have a similar efficiency.

The Shimano Alfine 11 gets less efficient as the gears get higher. That means that in the top gear, you’re losing ~15w through drivetrain inefficiencies when compared to the Rohloff. If you do the bulk of your riding in the higher gears (ie. on the flat) you will have the most to lose.

The Shimano Nexus 8 (practically the same as the Alfine 8) has an interesting efficiency graph. It’s quite obvious that gear 5 is the direct drive gear, using 20 watts less than the 4th gear. Given the way the efficiency gradually reduces in two sections, it’s clear the hub engages more internal parts the closer you get to gear 4 and 8.

Pinion P1.18 vs. Rohloff Speedhub Gearbox Systems

There are a few reasons why the Pinion P1.18 is less efficient than a Rohloff hub. Firstly, the chain runs 50% faster in the equivalent gear, so this results in more losses at the chain itself. Secondly, as the gears get higher on the Pinion it engages faster rotating internal cogs, potentially resulting in additional losses. And lastly, the large seals at the crankshaft may also contribute to the losses.

A HiLite Trekking bike with Pinion P1.18 gearbox.

What Is The Speed Difference Between Gearboxes?

When comparing the most and least efficient gearbox systems there’s a 22-watt difference in resistance. This translates to about 1.44km/h (0.89mph) slower travelling speeds using the Nuvinci 360 rather than the Rohloff hub, with all things being equal (200w, 85kg total weight, flat road). Knowing the speed difference, we can determine the time differences over the course of a typical touring day using Bike Calculator*.

On A Flat 100km Route (0% Gradient)
Over 100km, the 1.44km/h drop in speed from the Rohloff to the Nuvinci will add 9 minutes and 30 seconds to your cycling time (4.9% slower). To put that into perspective, carrying 30kg (66lb) extra on your touring bike would add 5 minutes to your ride time (2.6% slower) on the same route.

Over 100km, the 0.51km/h drop in speed from the Rohloff to the Pinion P1.18 will add 3 minutes and 15 seconds to your cycling time (1.7% slower). To put that into perspective, carrying 20kg extra on your touring bike would add 3 minutes to your ride time (1.6% slower) on the same route.

On A Hilly 100km Route (10km up, 10km down x5 @ 2% Gradient)
Assuming it’s hilly, gearbox resistance plays an even greater role because of the lower travelling speeds. The less efficient Nuvinci 360 adds 13 minutes and 20 seconds to your cycling time (5.9% slower) when compared to the Rohloff. To put that in perspective, carrying 15kg (33lb) extra on your touring bike would add 15 minutes and 30 seconds to your ride time (6.9% slower) on the same route.

Over 100km, the less efficient Pinion P1.18 adds 4 minutes and 31 seconds to your cycling time (2.1% slower) when compared to the Rohloff. To put that into perspective, carrying 5kg extra on your touring bike would add 5 minutes to your ride time (2.3% slower) on the same route.

*Through my weight testing, I’ve determined Bike Calculator to be close to accurate.

custom touring bike

The Rohloff Speedhub tested as the most efficient gearbox.

How Does Gearbox Efficiency Compare To Derailleurs?

A pretty common derailleur drivetrain efficiency number that’s thrown around is 95%, and this seems about right to me. The reason a derailleur system is less efficient than a singlespeed is due to (a) the derailleur jockey wheels and (b) the chain line; in other words, the angle at which a chain has to run from the front chainrings to the rear cogs.

A slightly worn chain tensioner was fitted to the above testing rig and it was determined it lost 2-3 watts using a gear with a straight chain line (resulting in 94-95% efficiency). This rate of efficiency is the same as the Rohloff hub when fitted without a chain tensioner. In fact, if you use a derailleur gear with a bad chain line (eg. a large front chainring and a large rear cog) it may actually be quite a bit less efficient than the Rohloff.

The Rohloff hub has a similar rate of efficiency to a derailleur drivetrain.

Does Gearbox Efficiency Really Matter?

I’ve now looked at the speed difference of gearboxes, gear weight, aerodynamics, tyres and dynamo hubs. Gearbox efficiency can make a significant difference at the extremes (comparing the best and worst performer) but is much more negligible in the scheme of resistance.

At most, a Pinion gearbox or Shimano Alfine 11 hub will cost you five minutes per 100km (2.1% slower) when compared to a Rohloff or derailleur drivetrain. This is similar to the effect of a dynamo hub generator (1-3% slower) when compared to a regular hub.

The biggest speed differences come from tyre rolling resistance and aerodynamics. When comparing fast and slow rolling tyres on flat and hilly 100km courses, we can add between 12 and 17 minutes (5-7% slower) to our ride time. The aerodynamic testing yielded similar results with panniers adding 12 to 18 minutes over 100km when compared to bikepacking bags.

So with this in mind, you’re best to pick one of the gearbox systems based on your budget and whether the gear range offered is suitable for the terrain you ride.

Click HERE To Check Out The Tyre Testing and HERE To See The Aero Testing

The post What’s The Difference In Speed Between Gearbox Systems? Rohloff, Pinion, Shimano appeared first on CyclingAbout.

Viewing all 150 articles
Browse latest View live